2023 Halloween Costume Contest
Enter 2023 Costume Contest
 

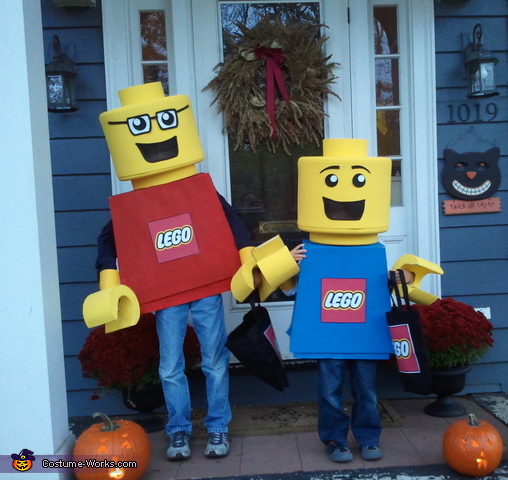
Lego Mini Figures Costumes

Rate this costume:

28 votes
13 comments  ·  add a comment 
Lego Mini Figures Costumes

Lego Mini Figures

Costume type:  Costumes for Kids
Categories:Halloween Costumes, Toys and Dolls Costumes

This homemade costume for kids entered our 2013 Halloween Costume Contest.

A word from Kristen, the 'Lego Mini Figures' costume creator:

My sons requested Lego mini-figure Costumes. I was a little worried how they would turn out, this was my very first homemade costume attempt, but they loved the end result.

I used a mini figure flashlight, basically a very large mini figure in order to get the dimensions just perfect. I made dozens of measurements and increased everything 8x. This was very important to make sure everything looked "right".

The heads are made of styrofoam, wood dowels, wire mesh and craft foam. The bodies are painted cardboard and the hands were made with foam soda can "cozies", cardboard and duct tape.

I let them chose the mini-figure face, my older son wears glasses so I loved how he picked a mini-figure to match!

Rating: 4.5 of 5. Votes: 28

28 votes

Comments

#1 comment by Karen September 18, 2013

Kristen these are amazing ! I would love to make these for my kids this year ... Would you share the specifics involved with making these ?

#2 comment by Rhilda September 25, 2013

Awesome costumes very good idea I think it is the best ihave seen

#3 comment by Dawn September 13, 2014

Is there an easy to follow tutorial for this?? I need to make this for my 3 yr old this halloween!

#4 comment by Kristen Clemente September 13, 2014

Hi Dawn, it was mostly trial and error although I did search the web and I noticed that the costumes that were out of proportion looked "homemade" in a bad way. My younger son's body was actually narrower than it was supposed to be (in order to fit him) and I think you can notice it's a little off.

I used two foam discs from michaels for the head. They were held together by 6 wood dowels and chicken wire with a rectangle cut out for the mouth. I then attached a sheet of foam (sold in large rolls at michaels) to the top and bottom foam discs using glue dots. Also, I brought my Minifigure flashlight into michaels to match the yellow paint perfectly which I painted the foam sheet and discs before assembly. The "knob" on top of the head is from the section of michaels that sells hard paperboard containers. I used a round one and cut it down an inch for the perfect size.

All in all it took about 3 weeks to make these costumes, I think it would be a lot easier with detailed instructions but for the most part I was winging it. I wanted to make the legs from cardboard but around October 30th, I decided jeans would be just fine :)

I'm sorry I didn't take photos during the process, good luck with your costume!

#5 comment by Jennifer October 6, 2014

Hi! You did an awesome job on the costumes! Can you tell me how you painted the foam? I have used spray paint on foam before, and it melted it. Thanks for any info/tips on painting.

#6 comment by Kristen October 6, 2014

Hi Jennifer, I used Craft Smart brand acrylic paint from Michaels, applied with the cheap foam brushes also from Michaels. Good luck with your costume!

#7 comment by Shealean October 9, 2014

Hi! I am making this for my nephews this year. Best example I've seen of a Lego costume! Where did you buy the yellow soda coozies from? They look so thick and I'm having such a hard time finding them. Thanks for your help

#8 comment by Kristen October 9, 2014

Hi Shealean, I got them at Michaels, actually. I think in the section that had the foam dress up hats and masks. To clarify, the foam soda cozy is only the part of the hard that fits over the wrist. Then I cut two "c" shapes out of cardboard for each hand and two rectangle shape pieces. One rectangle, I cut a circle a little smaller than the cozy. I curved the rectangle pieces to fit the "c"s and attached everything with duct tape then painted. Lastly, I squeezed the cozy into the previously cut hole. If this isn't clear you can email me and I could try to further explain.

#9 comment by a car October 12, 2014

can you email me close up pics of the way you connected the cardboard to the coozie?

#10 comment by Sylvia K. October 15, 2014

I made a LEGO costume for my granddaughter last year. Cost a fortune before it was said and done due to materials but now I could do it for far less. Used two foam circles from michaels and used rolled yellow poster board between the circles for the head. Taped another small poster board circle for the top bump. Taped with yellow duct tape. The duct tape and yellow poster board were perfect lego color. Cut out the eyes and taped black pantyhose cut outs to see thru. drew the remaining face with black marker. The body was blue corroplast (had to buy a whole 4' x 8' sheet to make a 18" x 12" body) Used duct tape again. All in all it looked fabulous!

#11 comment by Jodi October 16, 2014

Thank you for posting that you bought the yellow coozies at michaels. I went there and built my lego hands with the coozies, cardboard, tape, and paint. It came out great. Thanks again. Great photos and instructions.

#12 comment by Isabella November 18, 2014

Is this costume for sale?

#13 comment by Liz October 2, 2022

This is so amazing!! Did you sand the edges of the foam rings to make them look more rounded off? And can you please tell us the dimensions of the pieces used for the head??

Add Your Comment

* Comment: 
* Your Name: 
* Your Email: