Bender from Futurama Costume
Rate this costume:
|
14 votes
| add a comment |

Bender from Futurama
| Costume type: | Costumes for Men |
| Categories: |
This homemade costume for men entered our 2013 Halloween Costume Contest.
A word from Bryan, the 'Bender from Futurama' costume creator:
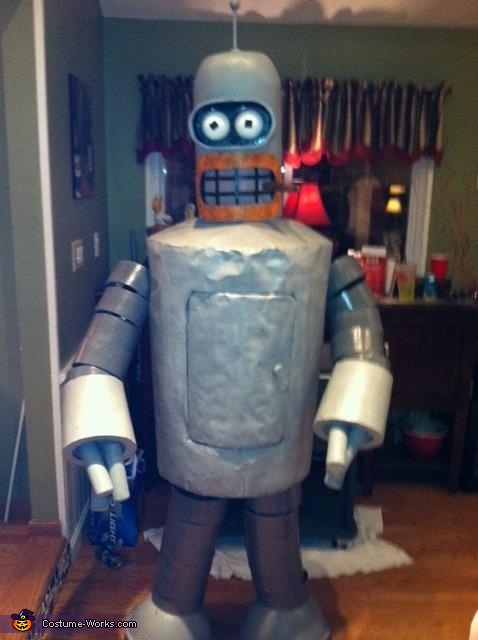
Costume is made from PVC, sonotubes, cardboard, contractor paper, two door hinges, two plastic bowls, wooden dowel rods, a rubber ball, styrofoam balls, rivets, epoxy, hot glue, and spray paint. Made by me in my workshop. Detailed build descriptions are below:
The Head
Materials: Sonotube, plastic lid, rivets, joint compound, cardboard, contractor paper, hot glue, epoxy, rare earth magnets, Styrofoam balls, dowel, rubber ball, black felt, primer, spray paint.
Fabrication: The head started as a sonotube (used to pour concrete footings), in which I tried to cut wedges that would bend and form a perfect dome. This of course didn’t work as perfectly as I had planned. The wedges were pop riveted to a plastic lid in an unplanned spiral pattern, which left gaps. I decided to fill this all in with mesh tape and joint compound because bondo and fiberglass was out of the budget. The eye cavity was made out of cardboard and formed around two large cans. One side was cut to the contour of the head and the other was left flat. I added a flat backing with magnets on the back side because I wanted to be able to interchange different eye balls. The eye balls are Styrofoam balls with black felt for the pupils, and a rare earth magnet glued into the back. Once I determined the proper placement and made a template (so I wouldn’t ruin the head), I cut out the mouth. Using another section of sonotube, I laid out “teeth” pattern and painstakingly cut it out with a utility knife. I messed up the number of teeth because I wasn’t paying attention and ended up having to cut sections out and make repairs. Once complete, this was glued on the inside of the head and then white see-through fabric was glued to the backside. In one of the “teeth” spaces, I added a piece of acrylic (plexiglass) with a rare earth magnet glued to it. This allowed me to have to have the cigar in Benders mouth at any given time. As if this wasn’t enough, I used another section of sonotube to make a rust ring for his mouth. This also had magnets for easy attachment. The antenna is made from a slice of a large wooden down, which was rounded over and a hole drilled in the middle. A smaller diameter dowel goes into this hole, and on top of that dowel is a small rubber ball from a dollar store paddle ball game. That was all attached with epoxy and a screw. This was all then base coated black and spray painted gray.
The Body
Materials: PVC pipe, PVC couplers, PVC cement, cardboard, contractor paper, hot glue, 2 small hinges, epoxy, section of a wooden dowel, primer, and spray paint.
Fabrication: The body framework was made from ½” PVC pipe, 45 degree elbows and Tees. The bottom ring was just large enough to squeeze my shoulders through and then I made the top ring larger to get a taper like Bender has in his body. Once I liked the shape, I made references marks and glued it all together with PVC cement. Next I wrapped this form in cardboard using hot glue. A door was cut out in the front and reattached using two small door hinges and expoxy and pop rivets. To get a smoother finish, I wrapped the cardboard in contractor paper using more hot glue. It still wasn’t perfect, but there was a budget. I made a retaining collar for the head to sit on using a section of a sonotube. A door handle was made from wooden dowel cutoffs. This was all then base coated black and spray painted gray
The Legs and Feet
Materials: Sonotube, plastic strapping for pipes, rivets, contractor paper, 2 plastic bowls, hot glue, epoxy, primer, and spray paint.
Fabrication: Each leg was comprised of 6 individual rings, which were painstakingly cut from a 48” sonotube. I went through a lot of utility knife blades. The diameter was too large, so I had to remove sections and then reattach the two ends. Epoxy didn’t hold so I had to use pop rivets. To hide all the seams and rivets, I wrapped each ring with contractor paper using spray adhesive and hot glue when necessary. The rings were connected using a length of plastic pipe hanging tape (plumbing supply aisle) on each side. This maintained spacing and allowed them to pivot as my leg moved and knee bent. The feet are just two large plastic bowls connected to the plastic tape with rivets and glued to the bottom ring with epoxy and hot glue. Everything was then base coated black and spray painted gray.
The Arms and Hands
Materials: Sonotube, plastic strapping for pipes, rivets, contractor paper, PVC pipe, PVC ¾” trim board, stretchy fabric, hot glue, epoxy, primer, and paint.
Fabrication: The arms were made exactly like the hands, except the ring diameter was smaller and there were only 5 individual rings. Then hands were more difficult since they are more conical than a perfect cylinder. It took a few test cuts to get the angle the way I wanted it because I wanted the hand to just barely slide over the arm ring. The seam took a lot of rivets to hold. This was all again covered in contractor paper, primed, and spray painted gray. The fingers are 1 ½” PVC pipe with ¾” PVC trim board cemented on the end to cap them off. The cap was then flush trimmed and rounded over on the router table. Bender has 3 fingers so I had to make sure I could fit 2 of my fingers in the pipe diameter. The only way I could comfortable wear these hands was to attach the fingers to a stretchy material with retaining rings and epoxy, and then glue the material to the inside of the hand. It worked and didn’t kill my hands immediately. Once again, everything was base coated black and spray painted gray
The Cigar
Materials: Dowel, rare earth magnet, electrical tape, contractor paper, hot glue, primer, and craft paints.
Fabrication: The cigar is a length of wooden dowel, which was wrapped in electrical tape (thicker in the middle). A rare earth magnet was glued to one end with epoxy and then it was all wrapped in contractor paper with the help of hot glue. It was painted with basic craft paints.
Challenges: Getting a smooth finish on the body on a budget was impossible. I would need to use thin metal sheeting to do it the way I’d really want it, but then I’d want to redo the entire costume. The hands were also a challenge and I went through several designs to find one that somewhat worked with a human hand.
Similar costumes:
Rating: 4.9 of 5. Votes: 14
|
14 votes
|


