Batman Two-Face Costume
Rate this costume:
|
5 votes
| add a comment |

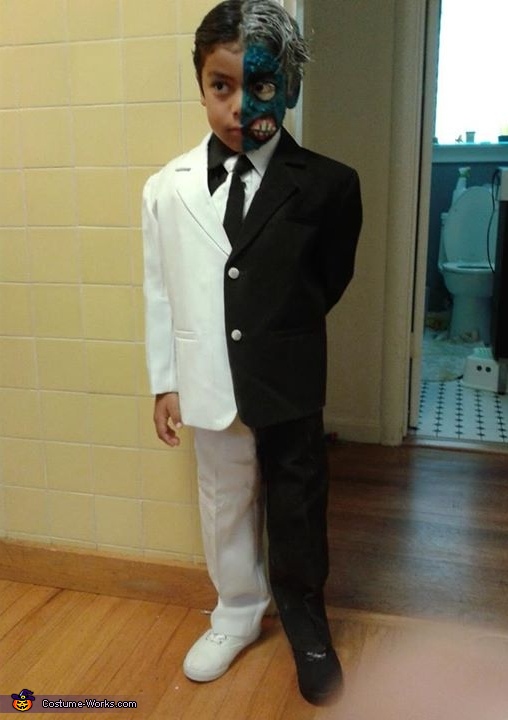
Two-Face from Batman: The Animated Series
| Costume type: | Costumes for Boys |
| Categories: |
This homemade costume for boys entered our 2014 Halloween Costume Contest.
A word from Ranjana, the 'Two-Face from Batman' costume creator:
My 6 year old son Ray is wearing the costume. He's a big Batman fan and came up with the idea of being Two-Face. We emulated the Two-Face from "Batman: The Animated Series"
THE SUIT: I ordered a little boy's 5 piece suit from blacknbianco.com in white. It came pretty quickly but I ordered it over a month in advance to assure we got it in time. I didn't know what the best fabric paint was to use and I was looking online at a bunch of paints and they seemed kinda expensive. I ended up just using a standard black spray paint that I had in the garage. For each piece of the suit, I put a piece of masking tape near the middle with the edge of the tape directly in line with the center seam of the article of clothing. The tie didn't have a center seam but it was easy to find the center and tape it in the same way. The masking tape should overlap the side that is not going to be painted. This is where I made the first error... I only used one strip of tape and some paper to cover up the side I didn't want painted but some of the paint bled through onto the unpainted side. It wasn't too bad but the line dividing the black and white suit weren't as clean as I wanted them to be. It was easily fixed with white spray paint but it wouldn't have been needed if I just put more tape and paper to protect the white side. Since you'll be alternating with which side is to be painted on the different articles of the suit, make sure you have a picture of the character in front of you and MAKE SURE YOU"RE PAINTING THE RIGHT SIDE BEFORE YOU START SPRAYING. I found it easier to paint while the clothes were hung up as opposed to how I orginally started wtih the clothes laying on a big piece of cardboard. Make sure you're in an area that you can get spray pain on or make sure you do what you need to do to protect the area around where you're spraying. Good ventilation, masks, & latex gloves would be good. I didn't use a mask and gloves though. Spray paint dries really quickly!
I bought shoes at Wal-Mart for under $6 in the girls section. I think the brand name is Garanimals. I sprayed the shoe to match the same side of the painted pant leg. I didn't bother taking the lace out for the shoe I was painting but I think it would be a good idea to do that and just put it back in after. You could stick some paper in the shoe if you want to keep the inside clean.
THE HAIR: I couldn't find a comb when I was parting his hair which would be really nice to have on hand (fine toothed) and so I tried Ariel's (from The Little Mermaid) suggestion and used a dinglehopper (a.k.a. fork). My son kept saying "Ow" and it wasn't working well and then I thought of using mascara. It worked beautifully! It also darkened his hair which made it look even better and so I kept dipping the brush back into the mascara tube and combing it back more. Before I thought of using mascara, I started out with gel on his right side (good side) and tried to get it slicked back but it wasn't working well and then I realized I should wet it which worked better but no where near as well as the mascara. Some of those steps could be eliminated but that's how I did it and it worked.
On the 'bad" side I used trial & error again - gel, mousse, white hair color spray and a lot of finger tousling. I thought of hair-drying it but I was concerned his hair would catch on fire with all the junk in it! The hair color spray didn't work as well as I hoped and I had a tube of white face paint that I worked through his hair to make it look more white. I didn't get any expensive paints for his hair or face, just what they had at the store in the halloween section. The hair felt really creamy but ended up hardening and holding really well.
THE FACE: Just one of those standard face paint color palettes from the Halloween store was used for his face (I think it was like $3.99 or something). My husband did the face painting. He made the outline for Two-face mouth first with red and colored it in with white. Then he used those cosmetic spongy wedge things that I got from Target in the cosmetics section for about a buck for a bunch of them. He used that to evenly paint the face (JUST HALF) using blue from the same palette. He painted half his neck and his ear too. Oh yeah, I forgot the eye. That was done with white paint from the same palette. The detailing was done with black eyeliner (i.e. line around the mouth, teeth lines, face lines, eyebrows). I made some oatmeal (the kind you make cookies with - not the steel cut kind) and then I started adding blue food coloring in it. I mixed it up and added more and mixed it up until the color looked pretty good. While the oatmeal was still warm (I'm sure it would have worked when cold too but we were running late), we stuck a little bit on parts of his face to add texture. I thought the oatmeal might fall off but it ended up drying up on his face nicely and staying in place.
OTHER STUFF: I thought about supergluing two fifty-cent pieces together with the heads of each coin on the outside but I forgot to do it. We put a blue latex glove on his hand (on the bad side). It was loose and baggy but it worked out alright. We detailed it with a black sharpie with hand features (e.g. palm lines, finger nails, other little lines). A black sharpie is good to have on hand for when you notice little areas in the creases that the spray paint missed. We kept a water bottle with a straw on hand so he could drink water without messing up his mouth paint. Another tip is to not have a mirror nearby if you're doing this on your kid - for mine, the temptation to look at himself was to great and he kept moving his head.
THE END: Avoid saying "All this is going to be a PAIN to wash out". I made that mistake and no matter how many times I tried to clarify what I meant, my son was dreading taking his costume off that night because he thought it was going to be painful. He stood in the shower with his eyes closed for a while and the oatmeal started coming off nicely (much better than trying to peel it off which he found painful). The hardest part to wash out was the mascara. It required liberal shampooing and a lot of working my fingers through his hair to get it out all the way. Baby shampoo worked well as did baby liquid soap for washing the face paint off (although that required multiple washes too).
I was really happy with the way this costume turned out. It was really impressive and pretty easy to put together. He loved his costume and said he wished he could be Two-Face forever (but I don't know how much of that had to do with his fear of taking it off!). People stopped him in the street to take his picture. We went to a comic book store and they went crazy over him and told us they had a costume contest and that he would most likely win. They said they'd email out the costume contest winners sometime next week but they gave him a Two-Face comic book before he left. He went to Safeway with his dad and one of the workers said that was the best costume they'd seen all day and he could pick any king sized candy bar he wanted because of it. And my sweet boy picked the Reese's Peanut Butter Cups not because they're his favorite, but because they're mine!
Similar costumes:
Rating: 3.8 of 5. Votes: 5
|
5 votes
|


