CATfish Costume
Rate this costume:
|
4 votes
| add a comment |

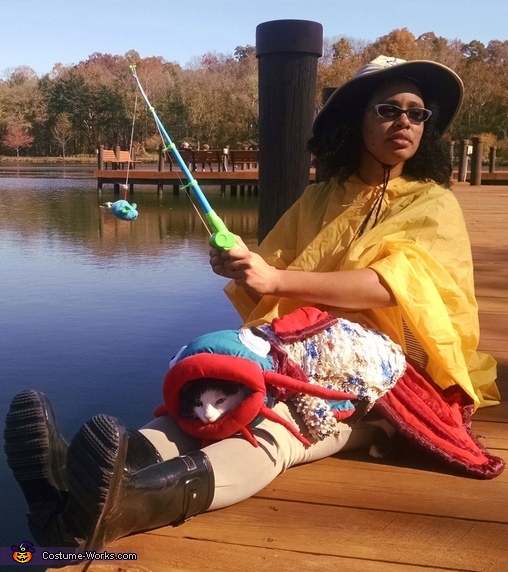
My 'cat'ch taking a rest with me on the docs
| Costume type: | Costumes for Pets |
| Category: |
This homemade costume for pets entered our 2014 Halloween Costume Contest.
A word from Amber, the 'CATfish' costume creator:
Nero the cat is wearing his handmade-from-scratch catfish costume and I am playing the role of the fisherwoman who caught him. Halloween is especially significant in my house because it is also an anniversary celebration for my cat's entrance into my life. Nero came to my home when he was neglected and cast out of his previous home during hurricane Sandy on Halloween 2012. Last year I bought him a bunch of pet store made costumes but since this year marks the 2nd year since he came to me, I wanted to make him something special. About 3 weeks before Halloween, I was pretty close to convinced that I didnít have the time or resources to participate this year, but for a lark, I decided to rifle through my scrap fabric pile. I found a cheap shirt that I bought at a drug store a while back that didnít fit me, but I noticed that when it isnít stretched to fit an adult torso, it looks a little like scales. Then I remembered that my cat's favorite toy happens to be a fishing rod with a stuffed mouse as the lure; I decided right then and there that I should turn him into a catfish so that his toy would be an even better fit!
I had never made a costume from scratch before this, at first this seemed to be a huge undertaking, but when I got to sketching it out, the model looked so unique and quirky that I had to commit to bringing it to life.
The first problem that I ran into was that the pattern on the shirt looked more like the pattern on a Koi fish rather than a catfish, so I did some research on types of colorful fish and found out that Koi fishes had the best color distribution for a spotted back and a solid colored head with different colored lips, but catfish had the most charismatic lip/feeler faces. I settled on a catfish/koi hybrid where the lips were a bright color different from the brightly colored head. I then did some research on color theory using the colors from the patterned shirt and then bought about $20 of fabric from Walmart to construct the rest of the costume around this shirt.
The second, unexpectedly difficult part to do next was to draft a pattern that would stay snug on my cat so that he couldn't wriggle out of it, while also allowing him to walk around. I say unexpectedly difficult because Nero didnít mind trying on cloth but for some reason he hated letting me near him with the measuring tape. After enduring much pain, I managed to get a measured, prototype body piece in the basic shape of a tube, allowing overlap on the left side for velcro so I can easily get him into and out of the costume. I made it entirely out of the same light brown fabric used for the underbelly, then sewed two 3 inch wide dark brown stripes along the sides to mark where to sew the shirt on to the top(as a decoration) and also to mark where there were good places to iron on the Velcro. I left extra cloth on the front ventral and back dorsal ends so that the tube of fabric had space to attach to sleeves and a tail, respectively.
Thankfully, the 3-dimensional aspects of it came more naturally to me than I expected because I make crochet animals as a hobby, so I already had the stuffing and yarn supplies and a basic knowledge of round, stuffed shapes. This especially helpful when I made the fishís eyes, which were crocheted out of white yarn with pieces of a black pillow case sewn on top for the irises.
Making the tail next, I quickly found out that the red fabric was not durable enough to maintain a rigid shape even with stuffing, whereas the dark brown fabric was the thickest and most durable of what I had bought. Since I wanted a rigid edged, red tail that was big enough to cover Neroís back legs and tail, I reconciled the properties of these two fabrics by cutting the red fabric in the shape of a fin and sewing it on top of a much larger piece of brown fabric. From there, I folded and stuffed the overhanging brown fabric along the edges of the red fabric and hid the seam where the two fabrics met by hand sewing a third darker red fabric over top of the brown fabric. I then sewed three spines on top of the red part of the fin and stuffed and covered those with darker red fabric too. I then sewed a couple loose lines into the top of the completed and stuffed tail piece and then used those strings to tighten and rib it so that it would align with the back dorsal piece of the body. The three smaller, decorative fins were made nearly the same way (using dark brown fabric as the base, then stuffing the trim areas, and then using different colored fabrics to decorate and cover the fins).
The easiest and most fun parts to make were the lips and feelers because they were very goofy and caricature-like. I used the brightest red fabric and cut two long strips of it nearly double the width of my catís head. When folded and stuffed, this fabric was very malleable, so I bent the stuffed strip that was to make the upper lip into a crescent shape and sewed it to the edges of the bottom lip. The feelers were then measured for accurately matched lengths, folded, sewn along one side, turned inside out and stuffed, then sewn to the underside and sides of the lips.
Last, but most difficult to do was the head piece, which not only had to be 3 dimensional but also had to allow enough space to accommodate my cat's head without choking him and fit snugly enough to stay in place. I accomplished this by making a wedge forming an isosceles triangle with 3 inch sides and a 2 inch base out of fabric I sewed together then turned inside out and stuffed. I attached the point of this triangle to the seam of the lower lip, which, unlike the feelers, was on the outside. I then repeated this process for the upper lip and added 2 more, smaller wedges at the corners of the lips, so that the center of the head had a more 3 dimensional space for his head to go. I covered up the meeting place between the 4 wedges with folded and stuffed brown fabric covered with red fabric, meant to look like gills.
Even after all that maneuvering, the head was still not the properly rounded shape I wanted on the top, so I decided to extend the gill cover by adding red fabric as a sort of veil with velcro on the edge of it. There was more velcro on the base of the wedge connected to the lower lip so that the completed head piece was detachable and re-attachable, making it easy for him to wear the body piece separately from the head if he got fussy and didn't want to wear the bulkiest part of the costume.
All of this took about 50+ hours of work spread out over 2 and a half weeks, but for me it was worth it to truly do my imagination justice. When I was done, I got a poncho out of my closet and bought a fisherman's hat and some rain boots(which I sorely needed anyway) and decided that my little model and I should go out to the local park for a Halloween photoshoot. The whole time he was in costume, people kept stopping us exclaiming "Aw it's a catfish!" and asking me to let them take pictures.
I had a lot of fun doing this and I am very excited that I was able to surpass my own expectations. I hope I have surpassed yours too!
Similar costumes:
Rating: 4.5 of 5. Votes: 4
|
4 votes
|


