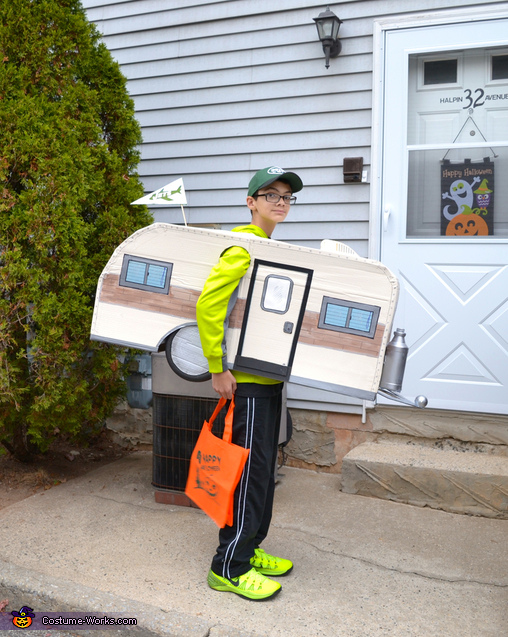
RV Costume
Rate this costume:
|
6 votes
| add a comment |

Matt trick or treating
| Costume type: | Costumes for Boys |
| Category: |
This homemade costume for boys entered our 2014 Halloween Costume Contest.
A word from Jennifer, the 'RV' costume creator:
My husband retired from NYPD a couple of years ago. Our family took a cross country RV trip a couple years ago from NY to CA and back (it was hubbys retirement dream). I was looking at the pics of the trip and my 12 year old son wanted to be an RV for Halloween. We are also NY Jet fans, so I combined the two. The whole costume cost me $3.00 to make. We did have some of the supplies already on hand.
Things you need:
large boxes from the grocery store, duct tape , black electrical tape , white paint primer (to prime the boxes before the real color goes on), acrylic paint, small ball (for the hitch), construction paper for the shades, small bottle (I used a bleach bottle), black and silver sharpies, a kitty litter scooper for the vent ( I used a dremel tool to shave the handle off), and wooden stick and paper for the flag
* Tape the boxes together with duct tape around the outside and on the inside
* I drew a curve (in the left& right sides )on the part that was going to be the back. Follow the curve and cut slowly with a sharp razor. Make sure you don't cut the middle that will be the back roof. Once you cut /curve the sides tape down the top with duct tape. Tape the back closed.
* Now you should do the same to the front. But don't cut the curve as round. It is the front. And tape it up as the back.
*Once the RV is assembled. Hold it up to your child and cut a circle almost in the center but a little towards the back ( this will be for their head to pop through. Don't make it super big, you can always make it larger. Cut holes for the arms. Cut a rectangle in the bottom and slip it over their head. Make them try it on to adjust the comfort level.
* Cut the sides ( where the wheels will show) right side then left. Half circle just enough to let the wheels show.
*Once everything is cut its time to prime the entire RV with paint. Let it dry
*While I waited I made the hitch. Measure how big of a hitch you would like and cut it out from the scraps of card board boxes. I painted it silver along with the bleach bottle (for the gas tank) and the ball to put on the hitch once its finished.
* Paint the entire RV what ever color acrylic paint you choose. Let it dry
* Draw windows and a door lightly with a pencil.
* I also outlined the rv with a pencil first and then used a black sharpie to go over all of my pencil once I was happy with it. I used a silver sharpie for the divits. Just go around the outside with little dots.
* I cut little construction paper shades for the windows and the window on the door. Once happy with the size I taped them down with duct tape (I cut in half).
* I also used the duct tape to detail the bottom of the RV by taping half on the outside and half on the inside (the part you can't see).
* I made a custom licence plate and break lights with extra card board. Used acrylic paint and hot glue to attach it to the rv
* The door was made by using black electrical tape (just follow the pencil lines) and tape down.
* On the top I drew a circle and a fan on top to fit under the kitty litter scoop (hot glued it down) and that became the vent.
* Once the hitch dried, I sliced across the bottom to make it slide into the RV and taped/ glued it on the inside so it would stay.
* Once it was secure, I hot glued the gas tank and ball hitch down.
* The flag was easy, hot glue a flag to a stick and glue, pop a little hole to slide it in the top and glue/ tape it down from the inside.
My son LOVED having everyone make a fuss over his costume! He was so happy, he told everyone it was home made and cost only three bucks. I think this was the best Halloween ever!
Rating: 4.3 of 5. Votes: 6
|
6 votes
|


