DIY Jack Skellington Costume
Rate this costume:
|
9 votes
| add a comment |

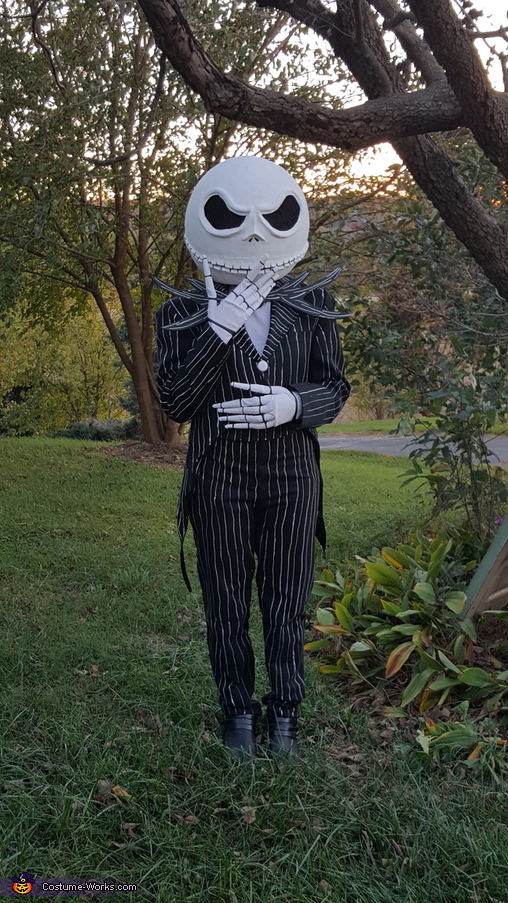
Me in the complete costume
| Costume type: | Costumes for Adults |
| Categories: |
This homemade costume for adults entered our 2016 Halloween Costume Contest.
A word from Rebah, the 'Jack Skellington' costume creator:
Our costume is completely homemade. I am wearing it, and my Mom and I made the costume.
For the bowtie, we used Crayola lightweight air dry playdough and shaped the face. While that dried we drew and cut out of 3 pieces of cardboard. And then layered the cardboard and glued them together with wood glue for a nice hard bond. Once everything was dry, we painted each piece and glued them together. Then glued and stapled a ribbon on the back of the cardboard so I could tie it around my neck.
We found an old pair of dress pants and dress jacket of my brothers and altered them to fit me. I am quite a bit smaller than them. LOL We tried on the pants many times, and sewed the inseam in and the outer seam. We took the coin pockets, and belt loops off in the front and left the ones in the back to use for the cumberbund. We hemmed them and then used fabric paint and painted the lines on.
We found an old cumberbund that we flipped over to use the duller side and painted stripes on to match the pants.
For the jacket, we did a lot of altering. We needed to take in the arms and shoulders. We needed to pull the lapels out some and we sewed them down to hold. We cut the front and then hemmed it and adjusted the original button location and painted it white. For the back, we sewed some of the front pieces that we cut off onto it and then cut it up and hemmed those. We then used the fabric paint and painted the strips onto it.
The head was made by using a blown up punch balloon and many, many, many layers of paper mache. We did about 15 layers of paper mache and then two layers of paper towels with Mod Podge, letting each layer dry for a few hours. Once well dry, we covered the entire head with a lightweight joint compound. We also used the compound to shape the eyebrows, nose, and mouth. Let that dry completely and then watered down some of the compound and painted it on so that it gave a nice smooth texture to the head. We then painted it with gesso and then two coats of white paint. After drying completely, we drew the eyes nose and mouth on and cut the eyes out with a sheetrock knife. Afer cutting it out we sanding the head and edges of the eyes. Then we used black paint to paint on the details which made it come to life. :) We also had a cheap, old bicycle helmet and used industrial glue to hold it in the head.
This was a very fun costume to make and the total cost was $10, and that was for the gloves. We figured it was cheaper and easier to purchase those. :)
Similar costumes:
Rating: 4.0 of 5. Votes: 9
|
9 votes
|


