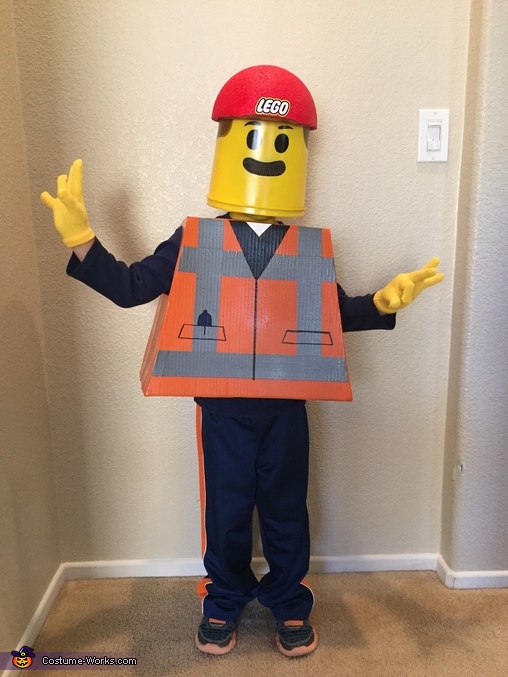
The Lego Movie Emmet Costume
Rate this costume:
|
8 votes
| add a comment |

The Lego Movie Emmet Costume
| Costume type: | Costumes for Boys |
| Categories: |
This homemade costume for boys entered our 2015 Halloween Costume Contest.
A word from Jennie, the 'Emmet from The Lego Movie' costume creator:
My 5 year old son, Riley is wearing the costume. The idea came one night when we were discussing what he wanted to be for Halloween. Knowing how much he loves Legos and The Lego Movie, I decided that I would attempt to make him his favorite character from the movie, Emmett.
How I made the costume:
I began making the costume after I found the plastic container (I purchased it at a 99 cent store) that would eventually be the Lego head. I drew the spot where my son's eyes were on the container and from there created the mouth with a black sharpie. After I was satisfied with the mouth I began cutting it out (since my son would see out of it). That proved a little difficult; I ruined one plastic container and had to start over with a spare one I had bought. The plastic easily cracked if not cut just right. After I completed cutting out the mouth, I sanded down the edges with sandpaper and then began spray painting the container yellow. After a couple coats of paint, I drew in the eyes and eyebrows with a sharpie and outlined the mouth as well. I glued the black plastic mesh in the inside so that my son's eyes would not be as visible.
I wasn't quite sure how I was going to make the hair. After a trip to Michael's I found the hollow half Styrofoam sphere and figured I could make the hair out of that. Well, after a little more brainstorming I decided that I would make it into a hat instead and draw the hair on with a brown permanent marker. To make the hat, I sanded down the inside of the Styrofoam sphere so that it fit better onto the container. Once it was the way I wanted it, I created the bill of the hat out of cardboard and then glued it to the sphere. It was spray painted red and a printed out Lego logo was glued to the front. I attached the hat to the container with glue and then drew in the hair with the brown permanent maker.
The body of the costume was made out of cardboard. After I took my son's measurements, I drew out the shape of the body (the front and back panels and the strip that connected them) onto a piece of cardboard. I cut them out with a knife and made sure the front and back were identical in size and shape. For the side panels I just measured the distance from the two panels (front and back panels) at the top and bottom and created the sides but I left a little extra to make a glue strip. Everything was glued together and let to dry overnight. In the morning, after my son tried it on, I realized it was too wide and had to take it apart and cut out a few inches from the front and back panels and then reassemble it. Before painting it, I covered up the edges with masking tape. Two coats of orange spray paint were needed to get the desired color. The detailing on the front and back panels was down with duct tape and permanent makers. I used Riley's little Emmett mini-figure as my model.
To completed the costume, I spray painted everything with a clear gloss to give it that shiny Lego look. We found a solid blue long sleeve shirt and a pair of blue pants with an orange stripe in Riley's closet. I bought some yellow body paint for his neck and I ordered a pair of yellow gloves off of Amazon.com for his hands.
This was my first time making any of my children a Halloween costume. Once I got past the brainstorming phase, I found it to be a lot of fun. Most of the work took place after the kids were in bed for the night.
Rating: 4.1 of 5. Votes: 8
|
8 votes
|


