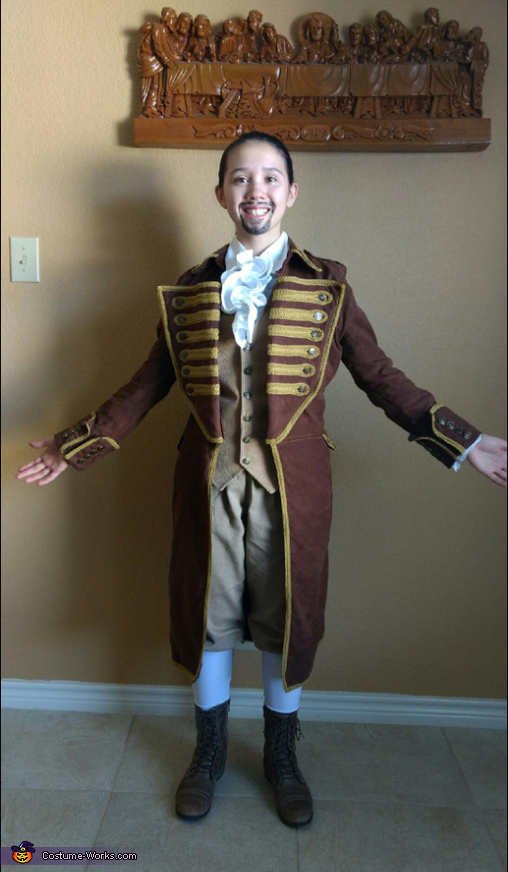
Alexander Hamilton Costume
Rate this costume:
|
9 votes
| 1 comment · add a comment |

Alexander Hamilton!
| Costume type: | Costumes for Girls |
| Category: |
This homemade costume for girls entered our 2016 Halloween Costume Contest.
A word from James, the 'Alexander Hamilton' costume creator:
Daughter of James created, wore, and wrote this essay for this costume
I got the idea for this costume from the musical, Hamilton, a popular musical among my friends, teaches, and me. In the middle of summer 2016, I got the idea: I should cosplay Alexander Hamilton for Halloween! However, I was going to cosplay Lin-Manuel Miranda, who first starred the role in the musical, rather than the historical image. Upon conceiving this idea, I designed my costume.
The jacket part of my design was a completely original design which I planned out carefully over the course of a week. I observed several 18th century for style and several types of coats for structure.
I created my beard with no-smear cream makeup using a stipple sponge. I already owned the tights and boots. I bought the pants, waistcoat, and shirt at goodwill, then modified them. For the pants, I cut and added an edge with velcro to make them breeches. I darted the sleeves of the white shirt to fit and added ruffles at the chest, lace to the sleeves, and two more buttons/buttonholes. The waistcoat,I replaced the current buttons with jeans buttons and added darts to the sides and shoulders.
The materials which I used for the jacket are synthetic leather material, amber trim, two brown zippers (for inner pockets), jean buttons, and amber thread, which I chose because it expresses the complexity of the design in a manner similar to that of jeans. I used 36 buttons in all: 6 at each front flap, 8 on each cuff, 4 in the back (for waist adjustment), 1 on each shoulder, and two for the jacket to connect in the front ( they connect with a tab with two button holes. I used a sewing machine, iron, cutting board, and dress form. I used the dress form mainly to hold it balanced and and see my current progress with better perspective than on myself, which I used more dependently, especially for fitting.
I generally worked on the jacket in fairly large sections at a time to focus on details in that piece before connecting it to the rest of the jacket. Among these details include multiple layers, trim, pockets, buttons/button bases/buttonholes, and combinations of these. At the bases buttons (which would be hammered in), I would have a 2"*2" piece of fabric folded under (for thickness and folded edges) to 1"*1" sewn to the base where the button would be.
The details I would like to highlight are pockets at the waist on the sides, the multi-pieced back of the torso, buttons/tabs at the waist in the back for adjustment, shoulder patches, shoulder buttons/tabs, underfolds at the skirt in the back, the collar with trim, cuffs with trim, and the front flaps.
Rating: 4.2 of 5. Votes: 9
|
9 votes
|


