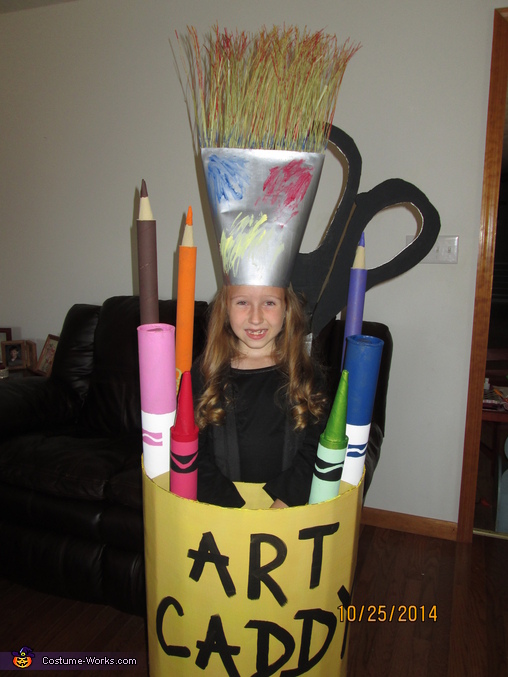
Art Caddy Costume
Rate this costume:
|
2 votes
| 1 comment · add a comment |

Art Caddy
| Costume type: | Costumes for Girls |
| Category: |
This homemade costume for girls entered our 2014 Halloween Costume Contest.
A word from Amy, the 'Art Caddy' costume creator:
My children and I always make their costumes every year. We have fun and get to spend good quality time together. I choose my theme each year as to something that was significant to them that particular year. This year was easy for me with my daughter. She has always loved art but this year she has spend a considerable amount of time painting, drawing and creating amazing works of art that will treasure forever.I used large cardboard boxes, poster board, broom straw, styrofoam, paint, gorilla tape and glue.
To start I measured the height of my daughter from about three inches below the underarm to about one inch above the knee. I also measured the width I thought would be good for her for the outer part of the caddy and had to measure and cut another for the inside allowing about 5 inches for the contents of the caddy. I also cut two dividers that would be placed between the inner and outer part of the caddy. Also needed was a circular piece of cardboard with hole cut out in the center for my daughter, to be placed on the bottom of the caddy. I used a large round container to roll the cardboard around and form the shape of the caddy and then taped the edges together on the inside. After finishing the two circular shapes for the caddy, I placed the smaller one inside of the larger one and taped the dividers to the inside. Last part of the caddy was taping the circular piece of cardboard with the hole in it to the bottom of the caddy and painting it. Also I cut the straps off of an old bookbag and taped them to the smallest circular part of the caddy on the inside so that it would be comfortable for her to wear.
To create the markers, pencils and crayons, I used round cardboard rolls for the base. The cap part of the markers were made by cutting a circular piece of cardboard smaller than the hole in the end of the roll and taping it down inside to form a floor to hold the cap center. To create the inside of the cap, I rolled a small piece of cardboard in a circle and taped it to the piece of cardboard that was placed inside the roll. I then cut out a circular piece of cardboard to fit over the center cap and taped. The crayon and pencil ends were created using the back cardboard cover off of a notebook. I cut a piece of the cardboard and rolled it up into the shape of a point, stuck it inside of the roll and glued it together. To make the crayon more blunt looking, I cut the tip of the point off and cut a "X" in the center of the remaining tip that was left, then used a screwdriver to push the cardboard down inside of the tip. After constructing the markers, pencils and crayons, I drew the details on them and painted accordingly. To make the correct shade of paint for the paper on the crayon, I just mixed white paint with the color I had chosed for the original color.
To create the scissors, I just drew the outline of each side on cardboard separately, cut out and painted. I connected them with a paper brad in the center so that they would work.
The paintbrush I created by first measuring my daughters head and cutting the poster board accordingly. I then taped the edges together to make a hat so to speak. Then I taped a 2 1/2 inch piece of rectangular styrofoam to the inside of the poster board all the way across. I cut the straw bristles off of the a broom and stuck them into the styrofoam all the way across. When finished with the straw, I pushed together the sides and glued the poster board to the straw and painted.
Cost of the costume: $10
We have received so many compliments on this costume as well as people stopping us to take photos. My daughter and I were thrilled with the costume!!
Rating: 3.5 of 5. Votes: 2
|
2 votes
|


