Mail Carrier and Postage Stamp Costume
Rate this costume:
|
11 votes
| add a comment |

Mail Carrier and Postage Stamp Costume
| Costume type: | Costumes for Kids |
| Category: |
This homemade costume for kids entered our 2015 Halloween Costume Contest.
A word from Lindsay, the 'Mail Carrier and Postage Stamp' costume creator:
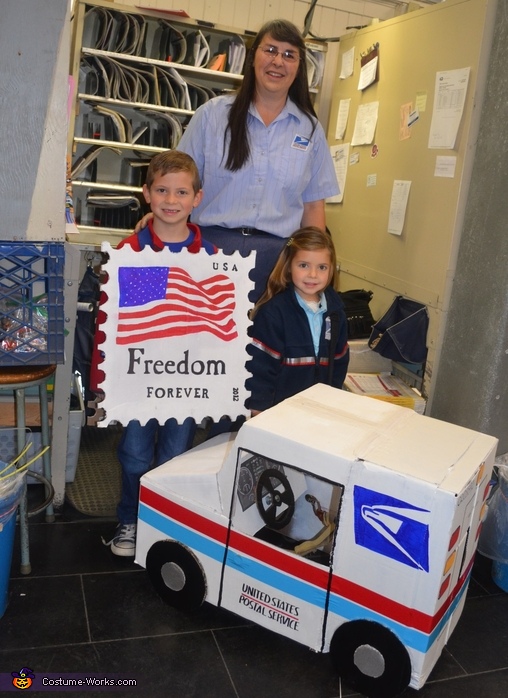
We have had the same mail carrier for the past 5 years. Her name is Cheryl and she always delivers the mail around noon time. When the weather is nice my kids and I often eat lunch outside, so seeing Cheryl and visiting with her has become a regular part of our day. As my kids have grown older they have enjoyed running down to the sidewalk to meet Cheryl as she brings our mail. Because we are so fond of Cheryl, when it came time to think about Halloween costumes for this year, our whole family agreed that it would be fun to dress my daughter up as a Cheryl look-alike and my son as the postage stamp.
Our costume building project consisted of three separate but coordinated elements: a mail truck, the mail carrier uniform, and a postage stamp.
Building the Mail Truck
We began our project by going to our local grocery store to collect some discarded apple boxes. To make the mail truck I cut one corner off one of the apple boxes at an angle to form the cab and windshield of the truck. I used a second apple box to give some length to the back of the truck. I attached the boxes together by sliding the flaps of the rear box into slits cut into the front box and then I reinforced the attached areas using hot glue and duct tape where necessary. Then I used a rectangular scrap of cardboard on the front of the truck to fashion the angled hood that real mail trucks have. I again used the flap/slit method to attach this piece. I used another cardboard scrap inside the truck to fashion a flat panel for the dashboard.
Once the truck was assembled, I painted the whole thing using primer and spray paint. When it was dry, the kids helped me add the details. We used colored duct tape for the stripes and scraps of cardboard and colored paper for the wheels, headlights, and reflectors. We traced the USPS logo onto the sides of the truck, and we even added Cheryl's actual truck ID number on the back. I glued paper dashboard instruments to the inside of the truck, and then fashioned a cardboard steering wheel out of scraps. The steering wheel is threaded onto a long screw with lots of washers so that it actually turns! Finally, I attached an old pair of suspenders to the inside of the truck so that my daughter can "wear" the truck over her shoulders and "drive".
Making the Mail Carrier Uniform
To make the mail carrier uniform we gathered some clothing items from my son's stash of outgrown clothes as well as from the local thrift store. For the pants I used a pair of gray dress pants and simply glued a blue ribbon down the outside of each leg. For her shirt I started with a light blue polo shirt and then printed and laminated a USPS logo and a "Cheryl" name tag and glued both to the shirt. For her jacket, I used a navy blue fleece jacket that my son had outgrown. I then cut pieces of colored duct tape to the right width and length and taped them across the front and back of the jacket and around the arms. We also added a USPS logo to the jacket. The mail bag is made out of a recycled messenger bag which we decked out in duct tape and the USPS logo and then filled with some "mail". Finally, we added a pair of Cheryl-esque glasses. I had also planned to use temporary hair paint to make my daughter's hair black like Cheryl's, but I chickened out. :)
Making the Postage Stamp
To make the postage stamp we cut out two large squares of cardboard. I traced half circles along the edges of the cardboard and then cut along those lines to create scalloped stamp-like edges. We then painted the cardboard white, and when it dried we traced the likeness of an actual 2012 Forever stamp onto it. I then fashioned straps out of wide blue ribbon, criss-crossed them in the back for extra support, and attached them to the backs of each of the stamp pieces. I added velcro straps to the sides of the stamp so that it is held firmly against my son's body and doesn't flap about as he walks.
This costume has been SO much fun. Everywhere we go people love this costume, because everyone can identify with it because everyone gets mail! We have also encountered many past or present USPS employees who enjoyed our costume duo. The most exciting thing that happened as a result of these costumes is that when Cheryl showed pictures of the kids in their costumes to her supervisor, he invited the kids to visit the post office and get a behind-the-scenes tour. The kids were thrilled and the postal workers also seemed to enjoy having the kids on site. They showered them with treats, goodies, coloring books, etc. and everyone wanted their picture taken with them.
This costume was inexpensive to make and consists primarily of found and/or recycled objects and things we already had around the house. It was a fun family project that also served to honor our friendly and dedicated mail carrier.
Rating: 4.6 of 5. Votes: 11
|
11 votes
|


