Cyborg Costume
Rate this costume:
|
10 votes
| add a comment |

Cyborg Costume
| Costume type: | Costumes for Men |
| Category: |
This homemade costume for men entered our 2015 Halloween Costume Contest.
A word from James, the 'Cyborg' costume creator:
Selection
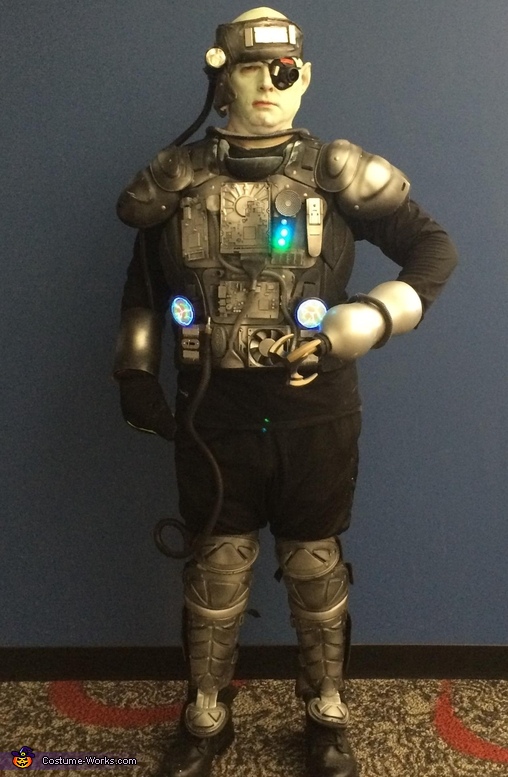
With few exceptions, most of my Halloween costumes over the years have focused on my love of history, with emphasis on Western and Pirate themes. This year, objective was to use my long standing love science fiction and integrate my experience with electronics and computers to create a costume that would be very unique, creative, and perhaps be a little “entertaining” to those who saw it. After quite a bit of consideration and research, I chose to create a cyborg from the deepest reaches of the galaxy. This choice made for numerous possibilities involving lights, mechanical movement, tubing, and nearly anything that creativity (and maybe a little paint), could come up with.
Development
Although a cyborg costume opens the door to wide variety of possibilities with features and styles, I created a design that broke down into the follow main components:
1. Main Breast Plate and Leg armor.
2. Head Piece and Eye Module.
3. Hand and arm prosthetics.
I. Main Breast Plate and Leg armor
My search for a suitable breast and leg armor on which to base my costume led to a sporting consignment shop, where I was fortunate to find outstanding candidates for these components: An umpire’s or catcher’s chest protector for the main breast plate, A pair of catcher’s shin guards for the leg armor, and a kickboxer’s head protector for the head piece.
First, I spray painted both the breast plate and shin guards a flat black to cover unwanted letting and to hide wear and abrasion marks. I decided to use a defunct IDE hard drive for the “center piece” of the breast plate and surround it with lights and decorations.
To secure the hard drive to the plate, I used commercial grade Velcro to obtain a secure fit, then injected layers of an adhesive called “Goop”. It would not only fill the large gaps between the flat surface of the hard drive and the curved surface of the breast plate, but provide an extra strong bond due to its flexible nature after drying. The semi flexible nature of the adhesive provided resistance to fracturing due to stress and movement. I attached an IDE cable to the port of the drive and secured the other end to the lower section of the breast plate.
For lighting, I purchased several twist on LED lights that blinked at random and had self-contained batteries. To create the “socket” in which to place them, I cut a small section of air drying clay to match the section on the plate where I wanted them, and pressed the lights in the clay and let it dry to create sockets that allowed the lights to be removed and installed as needed.
One of the key lighting features that gave the whole costume a very unique quality was the placement of two “Pocket Plasma Modules”. These modules have an amazing lightning/Van DeGraff generator -type effect. They were easily attached to two existing Velcro straps on the lower portion of the breast plate. Another lighting feature was a modified reading light that would both pop up into place and turn on when the side button was pressed.
I used 1/4 “ plastic tubing to create the conduit that runs from the upper left corner of the IDE drive to the lower right of the breast plate. Also used for decorations were several painted EPROMS, several different sized circuit cards, a broken transducer, and a defunct computer system cooling fan.
After all the main components were in place, I taped up the areas that needed protection. I sprayed a light coating of silver paint to provide a “dirty metal” effect.
Using more ¼” diameter tubing, air drying clay, and adhesive, I created an attachment point on the end of the right shin guard. I connected the other end to the lower part of the breast plate, using an old flexible SCUBA air fill attachment and zip ties. As with the breast plate, I gave a light final coating of silver.
II. Head Piece and eye module
The head piece was cut and modified to create a lower profile and to allow the attachment of an elastic band that wrapped around the head. The key feature of the head band is the side light. The light was purchased with a remote on/off pressure switch which attached to the back of the light. I used ½” plastic tubing to conceal the pressure switch cord and to create a cyborg looking conduit from the back of the light to the switch that can be place inside a glove for concealment. Different sized circuit cards and EPROMS were used to decorate the head band.
The eye module consisted of a telescope eyepiece, a medical eye patch purchased from a local drug store, and “blinking modules” created by using soda bottle tops and round blinking LED lights (sold as blinking earrings with twist on/off operation; I removed the metal ear clasps). The lights were glued inside the soda caps, then gently snugged inside the eye patch to allow the light to blink through the glass of the telescope eyepiece.
III. Hand and arm prosthetics
The outer shell of the hand prosthetic was created using a uniquely shaped gallon sized jug of iced tea. I settled on a rotating claw concept to provide motion to my costume. The only store bought costume prop was a “Batman” three pronged grappling hook that was cut down by an inch or so. Using a small 9v electric motor, small project case, wiring and a momentary contact switch purchased at Radio Shack, I built an internal hand hold and motor control unit. The modified claw was attached to the end of the motor shaft, and a decorative piece of tubing surrounds the shell. The shell is painted silver to contrast the black costume. The arm band is made from a short mailing tube. The keep the armband in place, four strips were cut from a generic cozy cup holder and glued to the inside. As with the other pieces the arm shell was painted black with a silver tone.
Reception
With the finishing touches of head paint to give an “other-worldly” appearance, I made my “debut” at my employer’s costume contest. At first, it was a bit awkward not having the use of one eye due to the patch. I also begin to get a sense of what a challenge it must to be to be an actor on stage or doing a movie/TV shoot. I enjoyed using the side light to get the attention of my fellow co-workers. Many of them didn’t know who I was until much closer, and some couldn’t believe that the costume is essentially 100% home-made. The functionality of the lights and prosthetic hand was a real big hit. Nearly all expressed that it should take a prize at our company’s Halloween contest, which it did (1st place from over 100 entries). At a local night club contest, I was among eight finalists, and was asked by several people I had never met to pose for pictures! It was satisfying to know that I made a very positive impression on nearly everyone I encountered.
Similar costumes:
Rating: 4.3 of 5. Votes: 10
|
10 votes
|


