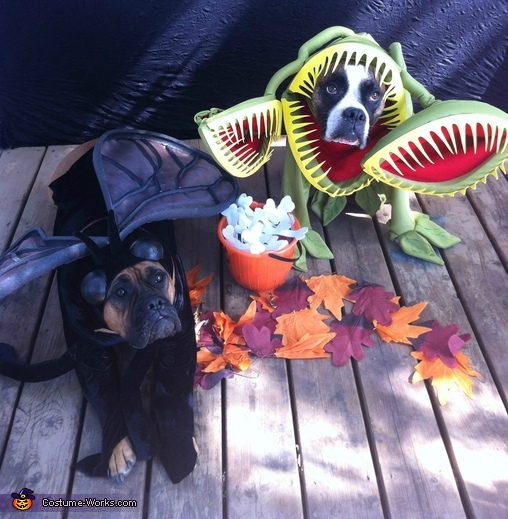
Venus and the Fly Costumes
Rate this costume:
|
14 votes
| 4 comments · add a comment |

Venus and The Fly. Treat please!
| Costume type: | Costumes for Pets |
| Category: |
This homemade costume for pets entered our 2012 Halloween Costume Contest.
A word from Tracey, the 'Venus Flytrap and the Fly' costume creator:
Every year I make costumes for the entire family and my boxer/bulldogs, Libby and Sawyer, are also included. I always try to think of costumes that go together like a couple costume and was sitting thinking about costumes and staring off when I looked at one of my house plants and the idea to do Venus and a fly came to me.
Several years ago, when walking around my home improvement store looking for a lightweight material that I could use to make snakes for a headpiece for a Medusa costume, I discovered a product that I now use in most costumes that I make. It has really changed my costume making abilities due to it's super lightweight. This wonderful product is plumbing pipe insulation! I use it in complete pieces or cut it into strips and it can then be glued into any form that is desired. I use low temperature hot glue and clamps to make the process faster.
My pups have very deep chests I have never been able to find costumes or patterns for costumes that will fit and the biggest challenge was making a pattern that fit comfortably on them. I did this by taking a piece of thin cotton fabric and and actually cut pieces larger than I needed, held them against my dogs body and used a soft marker to draw out the shape of the body. I made the holes around the legs a lot larger to ensure that when the leg pieces were sewed in, the outfit would fit nicely. Once I had a pattern made, I then used the same basic pattern for all of the costumes and added on details for whatever the costume was supposed to be. Patterns are avaible for dog clothes but are much easy to find for smaller breeds and can be adjusted to your costume idea.
VENUS. I made the basic pattern using a green stretchy fabric for the body and made a skirt in a terra cotta coloured fabric for the pot. I made the legs long enough to reach Sawyer's paws and then sewed on green fabric leaves around them. I also added leaves around the waist where the green fabric met with the pot fabric. I used a fabric marker for the veining in the leaves. I use velcro as a fastener at the back. I then made a hood that fit snuggly but not tight around his face and this was used to then attach the Fly Trap head. The Fly Trap heads were made using yellow craft foam, green fabric and red felt. I used the plumbing insulation to make the outer form of the mouth shape and sewed green fabric tubes that slid over the plumbing insulation. I cut the craft foam into long strips the size of the insulation pieces and cut the points into them. I then hot glued them onto the mouths. I cut the felt into semi circles and made pockets which were glued onto the back of the mouths. For the mouth going over Sawyer's head, I left the back open and it went over the hood piece and was sewed in place. I made the necks with plumbing insulation but added some wire inside so that they would be bendable and then covered them with the green fabric. They were then sewn onto the hood.
FLY. I made the basic pattern in a black stretchy fabric and a snug fitting hood. I used a styrofoam ball that I cut in half for the eyes. I painted them black and hot glued them onto the hood. I sewed antenna's and stuffed them to stand up before sewing them onto the hood. For the wings I used the plumbing insulation, cut into strips and hot glued to create the wing shape. I then hot glued on some organza which is shiny and see through and makes good wings. I added elastic so that it wasn't to tight and easily slipped over Libby's head but was tight enough to keep the wings in place.
Fabric $8, Plumbing insulation $0.69, Felt 2.00, Craft foam $1, Wire $0.20, Hot glue $1.00. Styro foam balls, $1.00 for 8... Less than $14.00 for both costumes. Photo's...priceless!
Rating: 4.9 of 5. Votes: 14
|
14 votes
|


