Freakshow Costume
Rate this costume:
|
9 votes
| add a comment |

Freakhow Costume
| Costume type: | Costumes for Women |
| Category: |
This homemade costume for women entered our 2017 Halloween Costume Contest.
A word from Serena, the 'Freakshow' costume creator:
The Freakshow Costume worn by Serena Bass
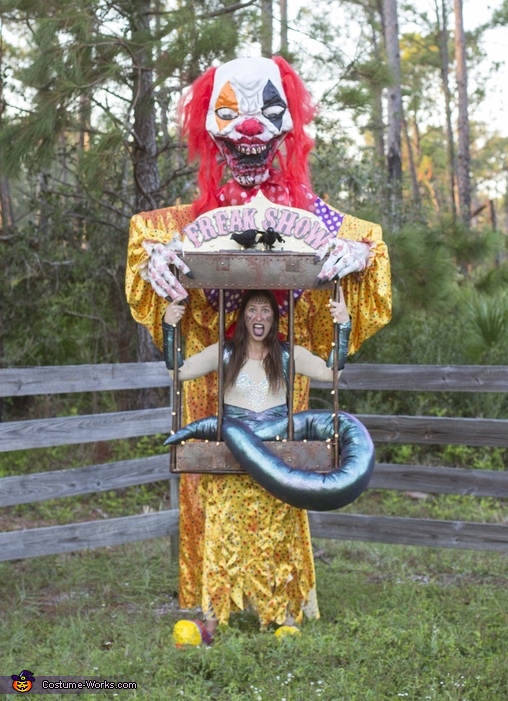
The idea for "Serena The Freakshow" came at the last minute to me. With all the hype about scary clowns this year, I wanted to involve a scary clown but take it to the next level.
What is scarier than being near a scary clown? I decided that being captured by one and then turned into a Snake Lady to join his traveling Freakshow forever trapped in a tiny cage would be pretty scary. So that is what I made!
This costume was pretty elaborate to make and I pretty much spent all my time for one whole week (besides one or two days that I had to go to my job) and about $250 to finish in time! (sometimes I did not sleep) I will describe in the most detailed way possible of how I created this, but I commend you if you make it to the end of this novel!
Chapter One: The Clown Face
This all started from a normal wall decoration of a clown head. It was no scary clown, but a good base to start from. Blood was needed. The secret recipe to the perfect blood (I learned from a costume I made previously) is actually hot glue and red nail polish. It turns out looking glossy and keeps the wet fresh blood look, with dimension. If the red nail polish is too bright, paint a black layer first!
Even after the added blood, the clowns face still looked a little too friendly. His hairstyle was all wrong. Now I am no barber, but I think this clown's new do came out pretty "Killer." Pun intended.
One last piece that had to be added to the clown was something so that it could attach to me at some point later. I put in a PVC rod in the head and left it pretty long, so that I could see how long I needed it later and cut it.
Chapter Two: The Clown Body
To make the body of the clown, all that was needed was a long piece of galvanized wire, and some foam or pool noodles to give them a little meat. This whole costume needed to stay lightweight so that I did not end up 3" shorter after halloween due to spinal compression. The rest of the body would be attached to my back later, and the clowns legs would somehow have to be my legs. But I would worry about that when I got to it.
The yellow and polka dotted fabric was basically just left to drape like a nightgown over the clown, and left really long so that I could cut the length later based on how tall it ended up being once on my back.
The clowns legs were my legs, so I needed to blend in. I made a floor length skirt to match the fabric his body. This would hide my legs.
Clown shoes! I learned that clown shoes are hard to walk in. Bravo, all you professional clowns out there. I made my clown shoe "Covers" Out of duct tape, cardboard and newspaper. I traced my normal shoe on cardboard first, then drew along extending the end of my foot to be "Clown Shaped." Then I added some cardboard strips standing vertically along the outline of my shoe to contain the shape of everything. I added the same size strip along the outer edge of the entire cardboard shape. Then I stuffed with newspaper to desired fluffiness and wrapped with the colored duct tape!
Chapter Three: The Harness , Cage, and Structure
Somehow this monstrosity needed to connect to me without looking like it is connected to anything. I decided the easiest and most sturdy way would be to attach everything to a backpack. I started by attaching a PVC frame outside the edge of the backpack, with extra connecting pieces going both behind me (to support the clown) and out to the sides of me (to start the frame of the cage that I would be in,)
Next I made a vertical PVC pole that attached to the PVC that ran out from behind my backpack. This pipe would support the clowns head and attach to the slightly larger PVC pole that I connected previously to the clowns head. Once I cut those poles down the the right height so that I could fit through doorways, (even though I still had a hard time with that) I drilled a hole through both PVC pies and connected them with a screw and a wing nut to hold it tight.
Finally I got to finish the cage. This was my favorite part. I figured out how tall I wanted my cage, and cut all the vertical bars. For the rest of the cage, I didn't even have to do any real measuring. Basically I built one side of the cage while cutting the PVC piece for the other side at the same time so that they would match, and I could assemble it quickly once I got to the other side.
The cage was looking nice but still needed some work. Foam boards were added to the front of the cage to make it look more sturdy, that would be painted later to blend in to the cage. I wanted this cage to look like it was made of very sturdy, rusty old metal, but at the same time feel like a feather on my back. I added the same foam boards to the sides of the cage too, for good measure. I left the bottom of the cage open. This would be my access point to the costume.
Chapter Four: Painting!!
This part was fun. To make this cage look rusty metal, first I painted it a base coat of metallic. It was slightly bronze in some parts, and slightly gold and silver in other parts. Whatever metallic colored paints you have will work fine. Next I sponge painted more metallic paint. This time I used a dark brown metallic all over. Starting to look good, but needs more real rust. I sponge painted some regular burnt umber matte finish all over the joints of the cage, to make them look more rusty. This really gave a nice rust look. I then went back over with the metallic bronze sponge and highlighted some areas. A clear matte coat was sprayed on top for protection.
Chapter Five: Don't Feed The Snake Lady
The last thing left to finish up was the snake tail and my body suit! I started with a nude colored body suit, and then added jewels with Jewel-It all over the breast area of the costume to make it appear like one of those costumes you would see in a circus sideshow. Sparkly, beautiful, made to look revealing but not actually revealing anything.
The snake tail was made from some cool swimwear fabric that I found. I laid down on it and had my boyfriend trace my body shape all the way down to just above my knees. Remember, by legs would not be in the snake tail. I then extended the shape in a snake tail shape as long as I wanted it (about 6 feet) and cut it out, sewed it up, and stuffed it mostly to to the top. I cut a hole in the back of the snake tail so that I could fist my legs through and the tail could rest around my waist in the cage. I attached a piece of fabric acting like a flap so that the stuffing could not get out of the tail while I was in it as well.
Chapter Six: THE END IS NEAR
The only thing left was to put everything on and cut all the extra fabric hanging, and work out some minor details.
The clowns body needed more girth in his hip area, so I added an old Christmas wreath plastic frame around my PVC rod in the back to make sure "His hips don't lie."This worked well so I attached with zip ties and duct tape.
Another thing I noticed at this stage was that the front of his body looked flat, and you could see the frame in between me and the clown. I added some velcro pieced that attached the front of the Clown Gown to the back of my cage so it looked like his belly was pressed against the back of the cage and he was actually carrying it.
The backpack straps needed to be hidden, so I used leftover snakeskin fabric to make covers for them. I got carried away while sewing and made some snake arm bands too!
Lastly, I added the freak show sign made of foam board and construction paper, and then some battery operated christmas lights to outline everything!
That is The End. Thank you for reading my novel, and I hope you enjoyed reading about this crazy process! It is hard work but Halloween is THE BEST!
Similar costumes:
Rating: 4.7 of 5. Votes: 9
|
9 votes
|


