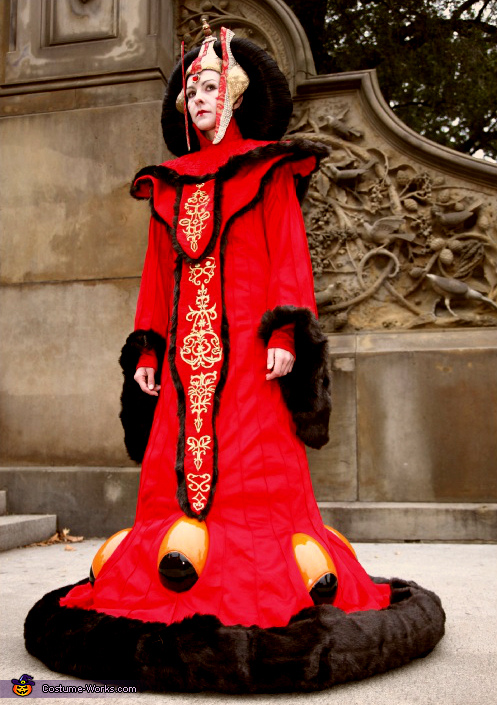
Queen Amidala Costume
Rate this costume:
|
160 votes
| 3 comments · add a comment |

Queen Amidala, front of the costume
| Costume type: | Costumes for Women |
| Categories: |
This homemade costume for women entered our 2013 Halloween Costume Contest.
A word from Rebecca, the 'Queen Amidala' costume creator:
In May of 1999 something happened that no person thought would for a good 19 years. Many had gone to a crappy movie (Wing Commander) just to see a preview. With promises to enchant us beyond imagination after, we waited in lines. One to get tickets and another when it came time to get into the theater. The audience electrified, having no idea what was in store. Unfortunately for George Lucas, his story telling had not advanced with the rest of his peers. The arguably most anticipated movie did not live up to expectations and certainly did not beat them. Perhaps those expectations were just unrealistic.
Despite it’s obvious flaws in overly childish characters and a lack of creativity when it came to using the force, it wasn’t a bad movie, it was just not a great one. Nonetheless, as a true fan, we trekked in droves to see it again and again. The Star Wars universe was still a place of civilized ideals.
The costumes where designed carefully, wonderfully with a distinct oriental influence, and very regal. My best friend and I had to recreate one. For a time we planned on 2. I would wear either a hand maiden or second Amidala replica; however, I think we both simply loved that red dress the most. We studied the few pictures we could get at the time, since the internet was just getting on its feet then. Magazines and books were our best references.
As 17 and 18 year-olds with little cash and little experience this was way over our heads. Yet, we were determined. My best friend had a keen eye for shapes and geometry. She carefully crafted the dress pattern herself. It was cut and sewn before I even knew she was working on it.
She also sketched out the embroidery that went down the front of the dress. Unfortunately, we could not afford to have that machined, nor did we know how to get the file into a computer, which might not have even been possible then. She cut out the pieces that would need the gold thread on them and got to work. Handing me a piece I looked at its sad spaced out stiches. She didn’t have the patience to embroider nicely. I took over that part and for roughly ten years would work on it on and off, as it took about 1 hour per inch(since I was watching TV at the same time).
College came and studies took over, the project never really left us, but we were at a standstill. I needed to work on the embroidery and there were other things we didn’t know how to do, the “egg shaped” lights at the bottom. She got married and packed up the dress pieces to take with her on her travels, far up north from where we started, then south south south east, and finally to the north east. I went west for several years and we didn't speak often for some time.
As luck would have it, after I graduated I got offered a position in a little town in the eastern state of Pennsylvania. My best friend was within driving distance again, and as luck would happen I got a date with someone nearby her. So I called her up and arranged for a visit.
The project never truly forgotten, we were close once again, and one of our major stumbling blocks was possible after I discovered paper clay. After a nice Thanksgiving dinner with her in-laws we set out on Black Friday to get some deals, including the Micheal’s craft sale. We got our package of paper clay, a foam head, and then got to work. The crown was now on its way and would be finished soon.
One final thing remained – those darn eggs at the bottom of the dress. Neither of us wanted to spend 100s of dollars to get them cast. But it wasn't looking good. I got some wonderflex pellets, but to get them consistent I needed something to mold it into. I started looking into molds, for weeks looking for lighting and various things with the egg shape. Then it hit me… chocolate ester eggs… they were made from molds. I found one… a big piece-o-metal 30$. It was looking grim, but then a search on Amazon brought me to clear plastic 7” Easter egg molds. The molds themselves were perfect! The right size, clear so we could paint the inside, a thin plastic we could cut, and about $2.5 each. The final obstacle was over!
The end was in sight. The race was on to the finish line: Painting, styling hair, fur trim, a hoop skirt to give the dress shape, and the right make up. All done just in time, and 2 suitcases later. We were ready. We never had so much fun in any other costume.
Rating: 4.6 of 5. Votes: 160
|
160 votes
|


