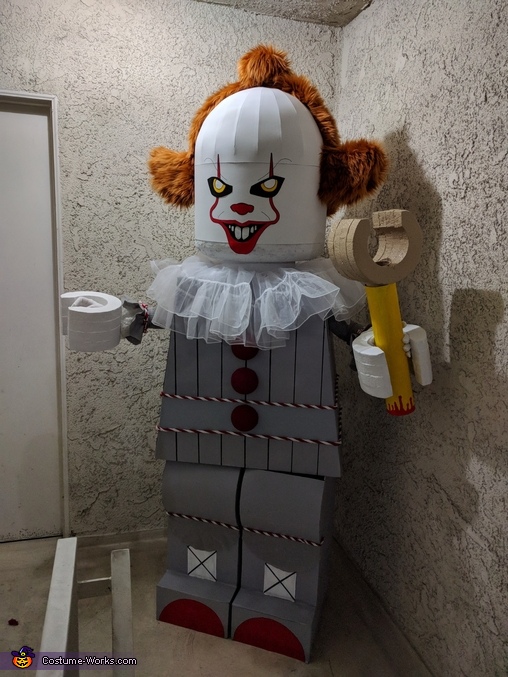
Lego Pennywise Costume
Rate this costume:
|
16 votes
| 2 comments · add a comment |

Pennywise angle 1
| Costume type: | Costumes for Adults |
| Categories: |
This homemade costume for adults entered our 2017 Halloween Costume Contest,
A word from Sarah, the 'Lego Pennywise' costume creator:
After the successful remake of Stephen King's "It" I knew that the streets would be lousy with dancing clowns this Halloween. But I was reasonably certain that there would be no Lego versions of Pennywise. And thus was born my 2017 DIY Halloween costume challenge.
Construction of the costume (which I'm seen wearing in the photos) was a joint effort between my crafty architect husband and myself. To make the costume form, he used a drafting program to scale the Lego figurine parts (head, torso, claw hands, and legs) to human size, ensuring that the character mouth would line up with my eyes and serve as a suitable view hole. We next took the scaled up measurements for the legs and torsos to draw and cut pieces from cardboard which we assembled using masking tape along the interior corners. We covered the cardboard with sketch paper attached with a spray adhesive for a smooth surface on which to apply paint.
For the claw hands, we stacked several sheets of rigid insulation foam to achieve the correct thickness and attached them with Gorilla glue. Once the glue set, we traced out two claws and cut out the shapes with a hand saw. We also cut holes in the center of the claws for my own hands to slide through. This gave me the ability to "grasp" things with my Lego hands. For a more comfortable fit, we lined the claw holes with segments of cardboard packing tubes, also attached with Gorilla glue. The tubes fit just below my elbows, leaving my actual arms free to move about.
We also constructed the head with stacked, glued sheets of rigid insulation foam, creating two multi-inch thick disks for the top and base of the head. The top part was left solid, and we cut a hole in the base for my head to slide through.
We rounded the edges of disks, which became the forehead and chin of the Lego head, using sandpaper. If you attempt this, be sure to work in an area with zero wind. The foam dust gets everywhere!
To complete the head, we glued small squares of rigid insulation foam together to create four columns that we placed between the disks, and then wrapped the column separators with a fitted sheet of poster board to create a smooth face surface. Using poster board allowed for more space within the Lego head and made cutting out the mouth hole much easier than it would have been had we simply stuck with foam throughout.
We spray painted the legs and torso gray for the base color of Pennywise's Victorian clown costume. We used additional acrylic paint for some of the details (stripes and shoes), and added a few fun extras, including painted foam sphere halves for his pompom buttons, and a white tutu for his collar.
Facial features were modeled after Bill Scarsgard's creepy visage and adapted to better match the Lego figurine stile. Those were also done with acrylics. The mouth is cut through the poster board and then backed with a layer of cotton mesh which is also painted.
We decided to supersize the clown’s forehead by using a Papercraft model to cut and assemble a fitted poster board dome that sits on top of the normal Lego head. Pennywise’s receding hair was fashioned from a yard of rust colored fake fur that we picked up from the Downtown Los Angeles fashion district. The shaped hair pieces along the side are formed around cardboard, and all of the hair was attached with a combination of hot glue and double-sided foam tape.
We painted the claws glove white with acrylics. I also wore white cloth gloves over my own hands to disguise them within the claws. I added cloth bell sleeves around Pennywise’s “wrists” using lace and gray fabric harvested from clothes found at our local Good Will. I hot glued that, along with red and white trim made by hand-twisting craft yarn, to the packing tubes. We added the same trim to the belt along the torso and the legs.
Our final painted accessory is poor Georgie’s arm, popped off Lego-style thanks to that infamous storm drain encounter in the opening scene of the movie.
The overall cost for the costume materials came in at a little over $100.
Our friends were a mixture of impressed and horrified. I think they’ve come to appreciate that my husband and I really go for it with wacky DIY concepts each year. One friend suggested that I quit my day job and make costumes for a living. That was the best complement.
Rating: 4.6 of 5. Votes: 16
|
16 votes
|


