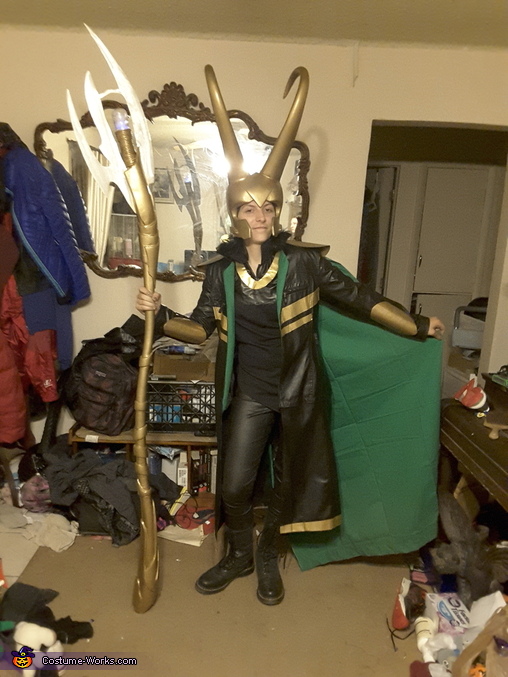
Loki Laufeyson Costume
Rate this costume:
|
7 votes
| add a comment |

Loki Laufeyson from Thor/Avengers
| Costume type: | Costumes for Adults |
| Category: |
This homemade costume for adults entered our 2016 Halloween Costume Contest.
A word from Ravyn, the 'Loki Laufeyson' costume creator:
The one wearing the costume is myself, I had the idea of creating this costume since last year when I first watched Thor and the idea just kinda built after watching Avengers for the first time. But of course mainly because Loki is my favourite villain in the Marvel universe. I asked my uncle to help me with the accesories (the helmet and staff) due to his experience with tools and building. My grandma helped me with the sewing of the costume to make it fit more of the description.
Money spent on materials: ~$155
Time:~a month/~25 days
Credit for the costume goes to me, my grandma, and my uncle. (And partially my mother for the boots)
Description:
Jacket/Coat: This was the first piece we started on, we looked around at the Arc and found a hip length, leather-like jacket, found two pairs of pants also with leather-like material (one matching the jacket), and green fabric. We tore apart the pants and attached the pieces to the bottom of the jacket to make it more into a trench coat with 3 slits. Part of the green fabric was cut to fit in with the inside of the jacket for the flaps that stand out. For the collar, we trimmed it and restitched it in a way to make it stand up. For the gold on the torso, it is just gold duck tape.
“Tunic”: it’s made from a mid-calf-length dress that was cut and hemmed to make the slanted appearance at the bottom. The leather-like patch, near the neck, is made from the remnants of pants that was used for the jacket. The original collar lay flat, so we took it off, filled it with a mesh and restitched to make it, like the jacket, also stand up. The gold ring around the chest/neck is gold duck tape.
Armour: The shoulder plates and the arm bands are made from sheet metal and bent to match my arms and shoulders. The arm bands are attached with duct tape and the shoulder plates are velcroed to the jacket.
Cape: The remnants of the green fabric was long enough to create a cape. It was hemmed, puckered at the top, and velcroed to the shoulder plates.
Pants: These were also bought at the local Arc, there are no alterations.
Boots: The boots were bought at Dillards, they were more like a gift from my mother and I just had the sudden thought that they would look perfect with the costume. They are Doc Martens brand.
Helmet: The helmet was the piece that we spent most of the time on. The first thing we did was create the horns for the top, we wanted to get them as symmetrical as possible before even starting on the rest of the helmet. The horns are wood, covered with fiberglass and fiberglass resin for strength and then filled with Bondo Body Filler for smoothness. Next, we used a bicycle helmet from the Arc, shaped it to have a flatter top, took out the sides and sanded it to be smooth. My uncle used, what he called, bendable wood to form the sides and the back of the helmet. The wood was also used for the decorations on the back and sides of the helmet. It was then sanded, primered, and painted.
Staff: We were running out of time when deciding to make the staff (3 days), but it still turned out to be really realistic. The handle was made also from wood and was sanded smooth. For the decorations we used carpet, by cutting out several of the shapes that are on the original and stapling them to wood. We used fiberglass resin to cover the carpet to make it hard and so we could sand down the mistakes. Bondo Body Filler was used again to create a smooth appearance and for protection from the fiberglass. The blades are sheet metal, cut closely to the original, we smoothed the edges and didn’t leave it sharp for safety and we drilled screw on each side to keep it in place. The wire that appears around the light/ “crystal” is actually clothesline wire, which we hot glued as we wrapped it around. We then primered the staff and painted it. The light is actually a salt shaker also from the Arc, it was a lucky find because we were running out of ideas of what to use. Since the top of the salt shaker can screw off, we were able to add a blue LED light with a small switch on the inside to turn it on and off, cotton balls were added to project more light through the plastic.
Rating: 4.0 of 5. Votes: 7
|
7 votes
|


