Paris Snow Globe Costume
Rate this costume:
|
11 votes
| 2 comments · add a comment |

Paris Snow Globe Costume
| Costume type: | Costumes for Girls |
| Category: |
This homemade costume for girls entered our 2017 Halloween Costume Contest.
A word from Rebecca, the 'Paris Snow Globe' costume creator:
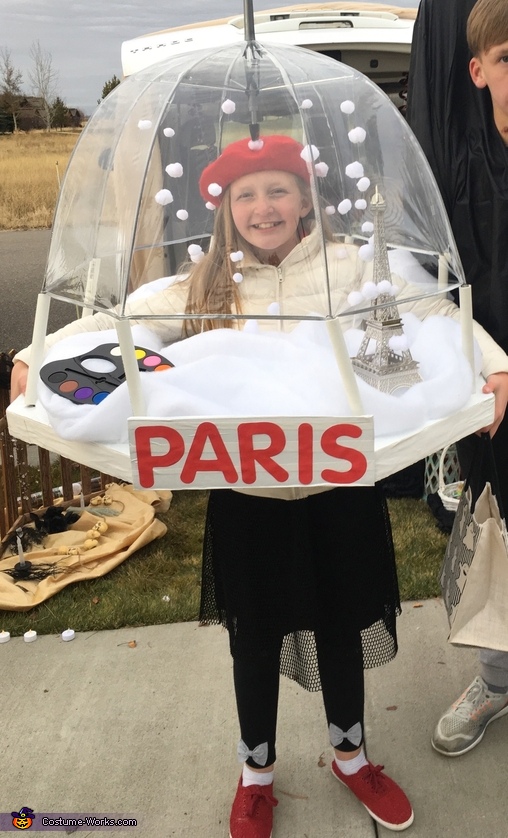
My daughter Adysen Clayton is wearing the costume. She has always loved snow globes! We had been planning to make this costume ever since last Halloween. We saw a couple of photos of people online that had made a snow globe costume, so we thought to ourselves, "We can do that!!" We just knew we had to put our own spin on the idea! The idea stuck in our minds and a year later we made it happen!
We started with blue board styrofoam that was 2 inches thick and a clear umbrella. We cut the handle off the umbrella and used zip ties to help keep the umbrella open. We put a cap on the raw cut metal edge of the handle so it wouldn't hurt her head. We then added white felt balls to clear fishing line and attached them to the top of the inside of the umbrella so we could get the snow effect. We then traced the width of the umbrella on the styrofoam, so we could cut the styrofoam accurately. We also cut a rectangle out of the middle of the styrofoam, which is where she would enter. We covered the styrofoam with white duct tape so it would look more like snow and taped in some ribbon straps in the middle so she could carry it on her shoulders. We added some white cotton batting to the base with pins, to get more of the snow effect. We then added a paint pallet and a small statue of the Eiffel Tower on top of the batting and base with hot glue. It was now time to attach the umbrella to the base! We took tie wire and attached it to the eight points of the umbrella. Then we fished the wire through an 8 inch long piece of 1/2 inch PVC pipe. Then we drilled holes through the styrofoam that we could put the wire through. We then taped the end of the wire to the bottom of the base so it wouldn't come off. Last, we wrapped a small piece of cardboard in white duct tape and added the word PARIS to the front of it in red paper lettering. We then glued it to the base at the front of the costume. We were done with assembly! We just had to add some final touches to my daughter. We adorned her with a horizontally black & white striped shirt, a red buret, scarf and shoes, and black leggings and skirt. She wore a white coat when we were trick or treating outside because it was pretty chilly! Construction took us about 5 to 6 hrs. And it was definitely worth it! My daughter felt so proud she had such a cool costume to wear!!
Similar costumes:
Rating: 4.5 of 5. Votes: 11
|
11 votes
|


