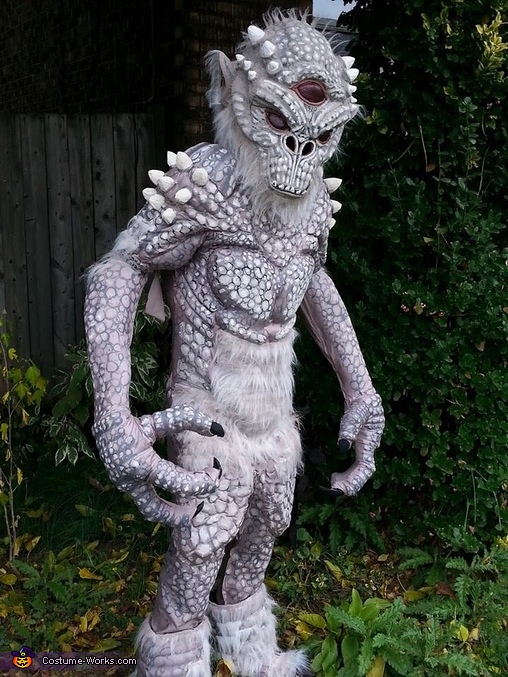
Skyrim Frost Troll Costume
Rate this costume:
|
6 votes
| 10 comments · add a comment |

Skyrim Frost Troll
| Costume type: | Costumes for Boys |
| Categories: |
This homemade costume for boys entered our 2014 Halloween Costume Contest.
A word from Andrea, the 'Skyrim Frost Troll' costume creator:
Every year I make costumes for my family and friends. I love Halloween and spend hours pouring over costumes and decorations, ready for the big night. Every year we experience around 500 trick or treaters and we try to do a theme each year. This is something that the entire family look forward to and we all participate in creating a show. As my children have grown, their friends have joined in, along with our friends. So much fun! This is the costume that I made for my teenage son, he loves video games and asked to be a Frost Troll from the game, Skyrim. After the evening was over and we all collapsed, tired and happy, a couple of our friends decided that they didn't want Halloween to be over. Our friend donned my son's costume and went off on the town. He sent pictures to us, as he went from bar to bar and even won a costume contest in one of them.
HEAD - I began by making the head. I used plumbing pipe insulation (PPI), that I cut into strips and hot glued together to form the shape of the head. BE SURE TO USE LOW TEMPERATURE HOT GLUE! High temperature will melt the foam quickly and I have experienced burns from the glue. My sister and I have been using this technique for years. You can form any shape with it and the finished result is extremely light weight, regardless of the size of the piece that you are creating, and is very durable. Love the stuff! I then covered it with multiple layers of tissue paper, letting the tissue paper dry between coats. I used a mixture of half and half, white glue and water. I used styrofoam to form horns and glued them on. I then painted the head using acrylic paint. Once the paint was completely dry, I coated the whole thing with water based interior/exterior craft varnish in a matt finish. I completed the head by cutting long thin strips of fur, then cut off small tufts and hot glued them on.
BODY - The body was made with various materials, PPI, memory foam and batting, and when completed I covered the whole thing in fabric. I used hot glue, which I pushed into the crevices I had formed with the various materials. I also used the glue to get the fabric into the crevices of the scale detail mentioned below.
CHEST AND ABDOMEN - I began by taking a t-shirt that was large fitting on my son. I outlined a simple lay out for placement of parts that I was going to be adding using marker. I formed the upper chest using plumbing insulation and hot glued it right onto the fabric. I used the glue gun to burn in circles for scale details. For the rest of the chest and abdomen, I traced over the drawing and used the tracing to cut the shapes from memory foam, which I hot glued directly onto the fabric. The foam was approx 2 inches thick.
RIBS - Plumbing insulation, cut into strips and hot glued directly onto the T-shirt.
SHOULDERS AND UPPER ARM - I hot glued memory foam over the shoulders and arms of the T-shirt to give a bulked up appearance. I shaped the foam on the arm to look like a bicep.
The entire t-shirt was then covered in fabric leaving extra fabric at the ends of the biceps to cover the elbow where the costume arm parts would meet the costume body. I added on styrofoam horns to the shoulders with hot glue.
BACK - I cut the back of the t-shirt down the middle so that it was completely open and used batting between the t-shirt and added fabric layer to bulk up the back. PPI was used to form the shoulder blades. I made the spine using triangular pieces of the PPI and hot glued them onto one side and covered in the fabric, again making sure to push the fabric into the crevices. Velcro was used as the fastener on both sides. This made the body piece easy to get in and out of.
LEGS - I took measurements from my son and made a pattern for the pants. I sewed the pants and added on thigh and calf muscles with the memory foam. I cut scales directly into the foam and covered with the fabric, again making sure to glue into crevices and define muscles and scales.
ANKLES - I made a tube using the memory foam and covered in fabric. I hand painted on the scales. This slipped on over the foot.
ARMS AND HANDS - I used strips of the PPI to shape the hands and arms which I then covered in Fabric.
FEET - I took a pair of old shoes and used PPI glued directly on to them to form the foot shape before covering in fabric. I added on fingernails using PPI to both the feet and hands.
The entire suit was painted. I used two shades for the scales, one lighter and one darker than the fabric. Black, white and red acrylic paint was also used for the head, nails and horns.
I finished by hot gluing on tufts of fur over the entire suit. Safety is always a concern for me, so all pieces are made to remove quickly.
The suit cost approx $40 to make.
Similar costumes:
Rating: 5.0 of 5. Votes: 6
|
6 votes
|


