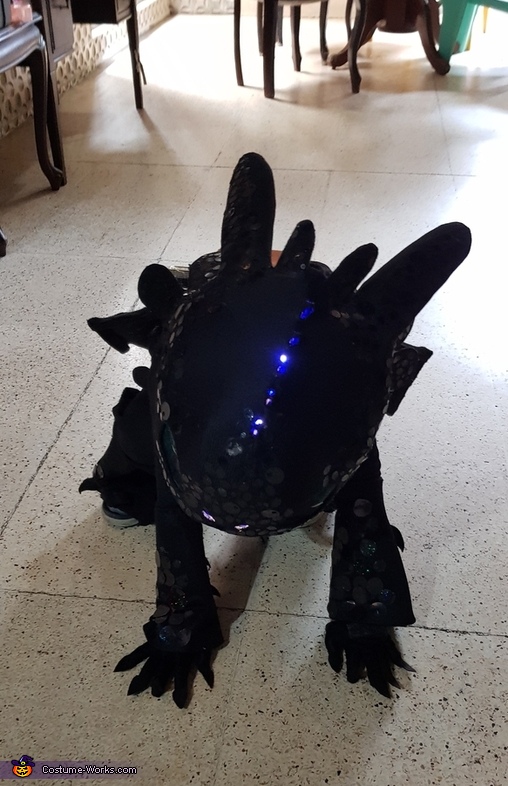
Toothless the Dragon Costume
Rate this costume:
|
10 votes
| 1 comment · add a comment |

toothless
| Costume type: | Costumes for Boys |
| Category: |
This homemade costume for boys entered our 2018 Halloween Costume Contest.
A word from Donna, the 'Toothless the Dragon' costume creator:
The person wearing the costume is my son.
He've been requesting me to make him a toothless dragon so I challenged myself in making one for him this year.
The main material used is black felt cloth and the head, wrist, and feet part is made of spongy rubber; the material used for slippers.
I've formed the head using the rubber, cut-out into toothless's shape and stick them together using a glue stick.
opened a hole for the eyes, nose, and the small horns on the forehead. The jaw was made separately so it will have a moving effect. The jaw was also made with the same material.
After making the base, I've colored the gum part pink, and same color mixture to a white felt cloth for the tongue.
I've cut the felt cloth into tongue shape, cut it in half and sew them together in the middle again to have a little volume and to make it look like tootheless' tongue in the movie.
After the head is done, I've covered it with a black silk-like cloth up to the back so it will cover the back side of the head, and inside the head, I've installed an LED light, but since we only have a warm color, I've covered it with a blue plastic-like material so when you turn them on it will be color blue.
Nextly, I've started making his clothes for the torso, the material used here is the same silk-like black cloth to match with the head. I measured him and made a long sleeve shirt.
After sawing the main shirt, I've rolled the rubber for the wrist and had the black cloth cover it so it will not fall off and it will also have the same material as the shirt.
Then, I started making small gloves that have felt cloth as claws to make it safe.
Next, I started to make the pants. For the pants, I just used his old black pants and sew the rubber material on the feet art below the knee to have a more dragon fee-like effect, and to of course give him room to move around and now talk very stiffly. The claws again are made of felt cloth.
After most of it is done, I started making the tail, where it's mostly made out of felt cloth, but the pointy part was made of the rubber to make it stand. So I measure and shape the tail and cut a hole to insert the rubber for the pointy part, but made sure that the base on the pointy part will have room for the LED light since this part also lights up.
I've sewed it all together, including the fin part, but I've made this part fix so it will not fall off while he moves around. The bone of the fins is made of barbecue sticks. but before covering it on top, I made sure I added the vikings logo.
after attaching it, I've inserted the LED into the tail before stuffing it with a foam, then closed it by sewing it.
I've added an extra cloth on the tail so it will have some room to put in the belt to attach it on his waist.
lastly the wings and the saddle, I first shaped the saddle and made it like a backpack. Since I have a little more excess abaca rope from when making baby groot, I used it to shape the handle like for the shoulder and covered it with a silver plastic paper to make it look like a metal.
attached them all together and then, separately I started making the wings. I started with the bones or foundation of it, where I made sure it will have a mechanism that it will make it spread when the strings are pulled.
so I used two wide bamboo sticks I asked my husband to cut and prepare, and a smaller one for the bones.
I've put a hole in one side, secure them together with a roundhead fastener. added the string to the fastener, sew and covered them with a felt cloth then combined them together in another thin cloth to make the wings.
After which, I've combined the saddle and the wings. added a straw on the back side of the saddle so the string will have a place to go making sure the moving wings mechanism will work.
Lastly, I made him a Halloween basket basing it on the basket in the movie when hiccup was trying to feed him so he could put the fin he made for him in the 1st movie.
By the way the LED also goes throught the nose so the nose part also lights up.
Rating: 4.3 of 5. Votes: 10
|
10 votes
|


