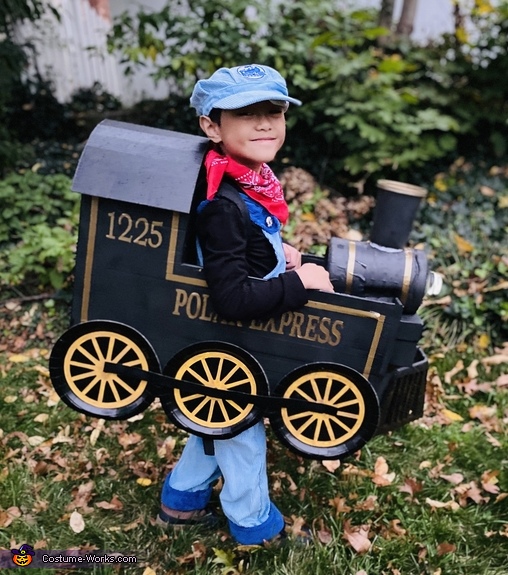
Train Engineer on the Polar Express Costume
Rate this costume:
|
27 votes
| 5 comments · add a comment |

Our train engineer on the Polar Express
| Costume type: | Costumes for Boys |
| Category: |
This homemade costume for boys entered our 2020 Halloween Costume Contest.
A word from Sherry, the 'Train Engineer on the Polar Express' costume creator:
My six-year-old son loves trains the Polar Express since he was four. Each year we ask him what he wants to be when he grows up and what costume he wants to wear for Halloween which is basically the same as what he want to be so for the past 5 years, my husband and I try to make that into a reality and he always enjoys wearing his costumes which makes all the effort worth it. This year we finally made his Polar Express dreams come true by creating a homemade Polar Express train made out of a heavy-duty cardboard box that was the packaging of a luggage that was gifted to our son 2 years ago. My husband kept the box because it was sturdy and knew we would eventually have a project using it but just didn't know when we will eventually use it. Well, this year was finally the year when it was put to good use.
He cut the box to create the main body of a vintage steam engine train and whatever unused portion of the box, I used to create the cow catcher in front of the train. For the boiler of the train, my husband used an empty 3L water bottle that we used for a recent camping trip. He cut a hole on top of the bottle which doubles as an entry point for the working light for the train which was actually a camping headlamp (we just took off the straps) for this costume and also where we put chimney for the train. This hole also allows us to turn the lamp on and off. He also used an empty shoe box for the part under the boiler. The removable chimney was actually an empty large fast food soda cup with a lid. He used a packing tape to put all these pieces together except for the fast food cup (chimney) then painted all these parts using a spray paint. He spray-painted a bit of gold paint on the cow catcher just to create a more worn out vintage effect and for the grills of the catcher to pop out a little. He did the same for the lid of plastic soda cup.
For the details of the train, I started with the wheels by using 6 black colored paper plates and cut out the details using yellow cardstock that I glued onto the plates. I noticed that the cardstock I used was too bright and yellow, so I decided to stain them using brown watercolor. Once dried, I used a glue gun to attach them to the bottom of the train. I also added a black strip to make it look like a coupling rod for the wheels.
For the lines and the 1225 and Polar Express writing (which was very important to my son), I used a spare gold window cling vinyl I have on hand and cut them using my cutting machine. It would have been easy for me to just buy gold letter stickers but did not want to spend extra for something I can make myself. I used craft glue to stick them onto the body of the train. My son wanted a roof over the firebox, so my husband just cut out a piece of softer cardboard in a square, spray painted it in black and attached in to the top of the firebox using packing tape and inserted a sturdy strip of cardboard under to hold the roof in place.
Finally, we used an old backpack that we inserted inside the firebox and create holes for the straps to allow our son to wear the train costume. Overall, we spent about less than $15 for the DIY train. $3.50 for the gold window cling vinyl, $1.00 paper plates, $5.00 spray paint, $2 yellow cardstock, packing tape and glue.
Thankfully we used a heavy duty cardboard box to create this costume as it wouldn’t have survived a trunk or treating event in town as well as to use trick for treating on Halloween itself as he loved playing with the train so much. My sister in law had suggested that we also use this train as a display in our home for Christmas.
Rating: 4.0 of 5. Votes: 27
|
27 votes
|


