Amazing Medusa Costume
Rate this costume:
|
5 votes
| add a comment |

Full Length Medusa
| Costume type: | Costumes for Girls |
| Category: |
This homemade costume for girls entered our 2014 Halloween Costume Contest.
A word from Tara, the 'Amazing Medusa' costume creator:
The Idea:
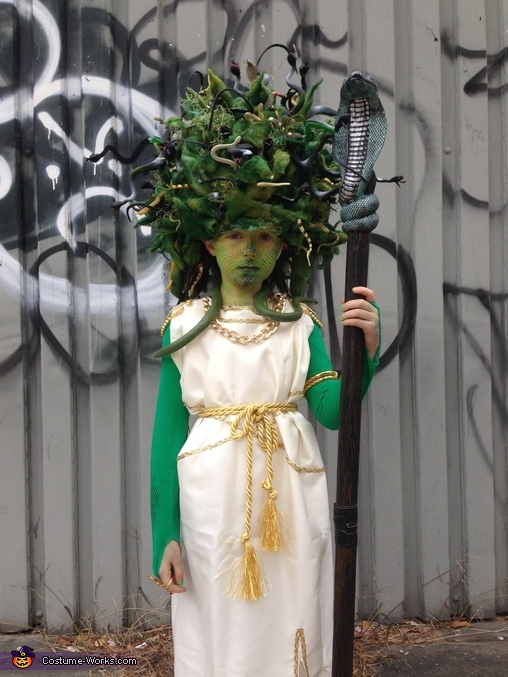
I love the fact that my 6 year old daughter is not satisfied with the standard, store bought princess costume for Halloween. It was her idea to be Medusa this year and I was super psyched! I had to put some thought about the most important element of the costume - the famous hair. That was the most difficult part of the whole costume, because I wanted to create a real showstopper of a wig and not just a simple headpiece.
The very first thing I did to start was sketch out exactly HOW I would make this wig, and then the supplies I would need.
I used the following supplies: lots of hot glue sticks, large foam sphere (craft store), quilt batting, spray paint in two shades of green, 2 dozen small (5") rubber snakes, 1 dozen large (10-12") rubber snakes, a basic knit cap (dollar store), 1 bag of decorative spanish moss (craft store), 2 curtain panels (dollar store), variety of gold beads/trimming (craft store), elastic, 1 gold rope belt, 1 pair of green tights, 1 pair of fishnet stockings, green, black & blue face paint.
The Process:
Step 1: Teased out the batting to make it fluffy, then spray paint both shades of green. Allow several hours to dry.
Step 2: On the foam sphere, draw the shape of (my daughter's) head. My goal here was to create a sort of cap that would fit on top of her head and provide a sturdy base to attach the snakes to. Slowly begin carving out the head shape with a soup spoon. It had to fit this to my daughter's head and continue shaving several times until the inside was smooth enough as to 1.) not be uncomfortable and 2.) is level once sitting on the head.
Step 3: Cut most all of the large & small snakes in half, save about 3-4 for finishing touches/balancing at the end. Hot glue the snakes to the foam sphere, keeping balance visually and so that the weight of the snakes is evenly distributed over the sphere.
Step 4: Batting should be dry by this point. Rip pieces of the batting and rub between both hands as to make a long, twisted shape at varying lengths. Fill in the empty spaces between the snakes with the twisted batting with hot glue. My goal here was to have it look a bit crazy and resemble snakes jetting out from the head. Save some batting for finishing touches at the very end.
Step 5: I measured my daughters head for the elastic (3/4"). I needed it to be tight enough to hold this piece on her head, with the weight of all the snakes.I placed the elastic right into the fold of the basic knit cap - the kind that folds up - basic winter hat. I made sure the amount of hat that was folded up measured about 2". I placed the elastic as close to the fold as possible, then sewed the elastic in the hat. Once that is complete there will be about another inch of the hat "fold" left.
Step 6: Attach with hot glue the "head" part of the knit cap into the part of the sphere that was carved out. Then attach the folded up part of the hat to the outward facing part of the sphere so that the sphere is secure to the knit hat.
Step 7: Use the remaining batting to cover the knit cap that is showing and any other empty spots. Attach the remaining snakes.
Step 8: Attach small clumps of the spanish moss with hot glue. The wig is complete! Next the easy dress...
Dress
Use the 2 curtain panels. Pin them together, wrong side out with the already hemmed edge as the bottom of the dress. Cut a neck hole. Sew the sides, leaving a hole for the arms, I made 2 pleats before sewing the shoulder seam, since my dress was for a small child. Turn right side out and hot glue decorative gold trimming on neck and shoulders. For the green arms I used a pair of tights. I cut two small crescent shapes out of the toe area of the tights, with about an inch of tight in between - I wanted this to fit over my daughter's hand and in between two of her fingers so it would stay taught.
Makeup
I found this technique online and it was super easy and looked amazing! I painted her entire face in green. I cut large pieces of the fishnet stocking and placed the fishnet over my daughters face in sections: forehead, left cheek, right cheek, nose then chin. With the fishnet stocking stretched, with a makeup sponge take a contrasting color - I used black, blue and dark green - and dapple the color on top of the fishnet. Remove the fishnet and voila!
Finishing touches: ring, arm band and snake embellished staff.
The Response
I live in New York City - you see some great costumes here and people can go all out. But I must say this costume was a showstopper....and a people stopper! You could see people's faces as they approached with looks of awe and amazement. We were stopped every several feet. People were taking our picture, gathering around. I was told many times that this was the best costume they had seen all day and when they asked if I made it, people were absolutely shocked. We got so much attention that it was actually too much for my daughter and a bit overwhelming for her at first. Once we got home, she kept talking about how she had the best costume and everyone was staring at her and taking her photo like a celebrity!
Similar costumes:
Rating: 4.0 of 5. Votes: 5
|
5 votes
|


