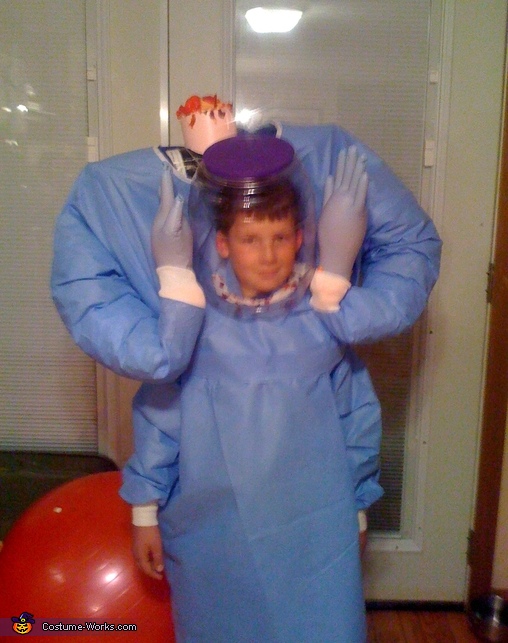
Headless Mad Scientist Costume
Rate this costume:
|
7 votes
| 1 comment · add a comment |

Headless Mad Scientist Costume
| Costume type: | Costumes for Boys |
| Category: |
This homemade costume for boys entered our 2012 Halloween Costume Contest.
A word from Tara, the 'Headless Mad Scientist' costume creator:
My son Tyler is wearing this costume but it was made adjustable so that even an adult could use it. First we had to come up with a system to make it easy for him to walk around but look convincing so we took a thin piece of wood and cut it like a "papoose style" board with several holes on each side to make it adjustable (this costume would fit anyone from age 6 to adult so we will be getting a lot of use out of this costume. Oh and we literally did not spend a dime on this costume. We added a piece of foam to the board to help keep it from slipping around and to provide a little cushion for his back. We ran a belt through two of the holes to help steady the board and made it long enough to go a few inches over his head. We decided to use a scrub top as the shirt and measured out cardboard tubing (could also use pvc pipe-just make sure to keep it as lightweight as possible) and framed up his shoulders to fit the scrub top. We ran a thin rope through the holes and adjusted them until it fit right. Then we used the same cardboard tubing and painted it fleshtone for the neck and sprayed "spray" insulation in mixing it with weedeater gas lines and pieces of waterhose painted red to look like arteries and the esophagus. Very disgusting!
For the body we used a fedex packing envelope opened up and placed over the neck (cutting a hole for the neck). Then we put a scrub top over the "shoulders" and cut out an "X" where his head would go-this is easiest to do when you have your little goblin wearing the frame so you get the cut in just the right spot. Then we added a "paper-cloth" gown that you could find in a hospital supply store (we just happened to have one in a first aid kit). We actually used 2 of these because we cut the arms out of one of them and attached them under the other arms on the first gown. A lot of the costumes we saw had no place for your actual arms an we thought that it would make trick or treating difficult if you couldn't use your arms. We basically cut holes big enough for the arms and used heat-n-bond and an iron to glue them in. Then we cut another "X" in this gown for his head.
This is my favorite part! We used a "cheese ball" plastic jar that we bought at Sam's and cut the bottom out (left a small ridge in the front part) and the whole back of the jar. This way it just slides on the head but still has support. I cut out some white fabric to look like gauze and made blood from mixing blue liquid detergent and a crystal light red drink mix (the kind you use for a water bottle) and put this blood all over the fabric and hot glued it in the rim of the jar (which also helped to protect from sharp edges). Then we put in green "glow" necklaces in the lid of the jar so at night time it appears like his head is floating in green goo--ewww! Love it!
I used clear fishing line to attach the jar around the back of the costume to keep it steady. Put the gloves filled with spray insulation in the top arms. Oh, and for those to give them shape I put packing peanuts in grocery bags and tied them off and just kept filling it up until it looked like an arm. I used safety pins to hold the fake hands up near where the jar would be to look like they were holding it. I think that's about it. I just used items around the house and modified them to fit this costume. Literally I only spent $1 buying the green glow necklaces to put on the inside of the jar.
Similar costumes:
Rating: 4.1 of 5. Votes: 7
|
7 votes
|


