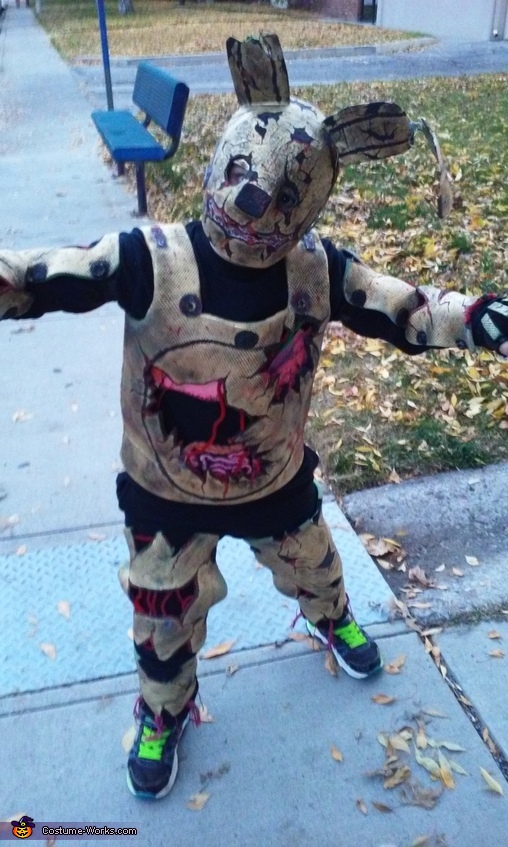
Springtrap Costume
Rate this costume:
|
32 votes
| 1 comment · add a comment |

Cull costume
| Costume type: | Costumes for Boys |
| Categories: |
This homemade costume for boys entered our 2016 Halloween Costume Contest.
A word from Shaila, the 'Springtrap' costume creator:
My son Ender is rocking this homemade Five Nights at Freddy's (FNAF) Springtrap costume. He loves to watch FNAF youtube video's online and is obsessed with the characters. The idea came from him asking if this could be what he dressed up like this year. Early September, I begin researching ideas of how I could make the body, etc. I crammed a lot of ideas together from a lot of different costume pictures, discriptions, and materials.
I started to gather supplies late September. I used a camping mat for each of the body pieces (chest, legs, and arms). I measured my son and hand drew a pattern on the mat and used scissors to cut it out. I hot glued the front and back chest pieces together to make the armor-like chest piece that slides over his head. For the arms and legs I measured the legths and cut out rectangles. After I had all them cut out I drew broken lines on each piece to make them look worn. I spray painted all the pieces with primer and then gold. After they were dry I used acrylic black and red (blood) paint and hand painted all the details onto each piece. For the dirty look I used a big paint brush and very little paint to brush over everything. This took a lot of time, patience, and some mistakes. I stapled black elastic to the arms and legs pieces so they could be slid on and off. I hot glued nuts and washers over the costume to cover up staple marks. For the organs in the chest part, I printed out free blank coloring pictures and used crayons to color them in and hot glued them on the inside of the holes I cut out. I used red and green craft wire and pipe cleaners for wires on the costume.
For the head I started by making a skeleton of it with strips of cereal box card board. I used 3 cereal boxes in total. All cut into different size pieces and strips. I used masking tape to hold each piece on to the original skeleton. And finally after a lot of time and patience it started to look like a mask. I used the same cardboard to draw some ear patterns. I used unfolded paper clips to hold the two ear pieces together. I hot glued and taped tgem to the mask. After I used 2.5 rolls of masking tape I put a very thin layer of paper machete, I already had, over the entire mask except the ears. After that dried I spray painted primer and gold on it. I then used the black and red paint to hand paint the details on. This costume took over a month to complete. I spent a few hours every day on it.
Camping mat...$17
Elastic...$6
Acrylic paint...$2
Paint brushes...already had at home
Spray paint...$10
Cereal boxes...already had at home
Paper machete...already had at home
Staples...already had at home
Nuts and washers...$5
Masking tape...$3
Craft wire and pipe cleaners...$4
Hot glue...4 packages from Dollar tree $4
Paper clips...already had at home
Print outs from home computer and crayons for organs...$0
This costume took a lot of creativity, patience, and trial and error to get it to look just right.
Similar costumes:
Rating: 4.0 of 5. Votes: 32
|
32 votes
|


